FamNet in Schools – Notes for Group Leaders
FamNet in Schools – Notes for Group
Leaders
Objectives of “FamNet in Schools”
Notes – Various Errors and Unusual
Situations
Adding
siblings when parents are unknown
Knowing where we’ve come from – our family background – is important to us all, so school pupils do family history projects from primary to secondary school. Today’s students are computer-literate and Internet-savvy: they will turn to the Internet to research their ancestors and use computers to tell their family story.
FamNet is a
web system developed in
These notes show how to set up and run a school group. The notes will develop further as we gain experience and receive feedback.
Objectives of “FamNet in Schools”
- Help pupils understand their personal history, background
- Find personal links with the past – makes it more interesting
- Make family history fun, interesting
Challenges
- This is a pilot project – we’re feeling our way. Need to find out what works, what doesn’t.
- The software will undoubtedly need more development as a result of what we learn
- Lesson plans and other support material are being developed as we go
- We have extreme range of FamNet resource within the group: My granddaughters can immediately tap into a database of 15 generations (210 ancestors) and are part of a huge linked tree with about 400,000 people in it. Others will be just starting, and may have difficulty identifying their grandparents. We need to set tasks and make it fun for both extremes.
Initial Admin and Setup
Every FamNet user has their own individual logon: this is necessary to manage privacy etc. So the first task is to get everybody in the school who will be using FamNet registered in FamNet.
- Get permission so that parents are OK with this, and we get emails to use. Even if you don’t need a permission form, it will be useful to send a note based on this to the families of pupils involved. “FamNet in Schools” is very much a family activity, and parents and grandparents may want to get directly involved in creating their family tree with their children. This is very much encouraged.
· See Permissions Template. Adapt this to your needs. In particular, anything between < > should be replaced, but you may make changes anywhere.
- Form School Group,
· Logon to FamNet, home page. Click [Groups] button.
· It should open on the [New/Find] tab. If it doesn’t, click this button
· Select group type “School Group”
· Set the
group id and name, e.g. “
· You will be admin. Add other admins if you like
· Send email to me and I’ll give the group GDB access to next year (no subscription required). Hopefully by next year we’ll have sponsorship for this and it will be automatic when a school group is formed.
- Enrol pupils (and teachers and parents and grandparents – anybody involved with this project) in the school group. Get the forms from the school and pre-enroll the pupils before the first session, otherwise all you’ll do in that session is enter people.
· Click tab [Manage Membership On Line]
· If they have pre-registered (see permission form), then enter either their email or userid, and the system will locate them. Click [Add] to add this user to the school group.
· If they have not pre-registered then enter their email and click [Add]. The system will take you through a dialog that registers them, sends them an email, and adds them to the school group. Keep a copy of these emails and bring them to the first session: you’re sure to have some mail bounces, and some who forget their passwords.
Any number of people may be enrolled in the school group: sponsorship gives
them all full subscriber-level access to FamNet. It is possible to use FamNet
without subscriptions as a user can always see their own records for free, but
there may be annoying issues when the system won’t let you see other people’s
records that you want to link to, or when shared trees are being created.
Besides, with sponsorship the site’s future is assured and FamNet has the
resources to grow.
General Session Admin
During a session you’ll probably want to have a browser tab open on the Group Admin page for On Line Membership (log on to FamNet, click [Groups], if necessary select the school group, and open the On-line Membership tab). You’ll have several pupils who have forgotten their passwords, logons don’t work, etc. I’ve put buttons to reset passwords on this form: the most relevant one is [Set Temporary Password]. This sets the user’s logon to “password”, which they must change immediately they log on (the system won’t let them proceed until they do).
See also below: Notes – Various Errors and Unusual Situations
Session 1
Main objectives of the first session
· Useful to have printed out a list of group members.
· Faulty emails – either pupils can correct this themselves (logon with email as entered, use [About you] and “Edit Profile”) or you can correct it from Group Admin.
- Basic Familiarity with FamNet.
· Watch Guided tour video (3 mins)
· Introduce the FamNet page. Getting Help.
· Try a search or two, open a record, talk about what you see there
· Create first record – themselves.
Then -
1. Building their tree.
- Create their first record – themselves
- Complete their immediate family – mother, father, siblings.
· Recording mother – use maiden name
· Do we have any step-parents? If yes, show how this is handled. If no, can skip this step
- Next generation: enter grandparents (probably alive)
- Uncles and Aunts (we could defer this)
- Next generation: great grandparents (probably dead).
- Add pictures
- How much will they do at school? At home? How much do we make this a family activity rather than an individual pupil’s activity?
·
At
Chelsea (=pilot project), we decided to encourage family participation as much
as possible, welcoming parents and grandparents to club sessions, and
encouraging pupils to do as much as possible at home with their family.
· At Verran (2nd) we said that the club members had to have computer access from home.
2. Some competitions.
- Who is first to create a tree with all grandparents?
- With all GGrandparents?
- With a picture of everybody to Grandparents? To GGrandparents.
- Ditto, to GGrandparents?
- Bonus points if every record has date of birth
- I could develop some automation so that the school group admin can just click a button and have the system give the stats. However I won’t be doing this until we’ve got some experience, so perhaps for next year when we have a better idea of what works.
3. Telling a story.
- Who is your oldest living ancestor?
How was their life different to yours? What has happened in
· Write a biography (life story) of this person. Better yet, get them to write it. Or work on it together. If they’re overseas: email, Skype. Can include video, audio recordings.
- Pick one of your dead ancestors and tell their story. Same questions as above, but you can’t go and ask them.
- Each pupil could have a turn presenting their story. We all have stories to tell, the subject doesn’t have to have been famous. Often little anecdotes bring a story to life.
- With pupils like Catherine (my granddaughter: she inherited extensive trees from me and her father) we might throw in some extra constraints – “Pick your favourite 18th century ancestor, and tell their story”.
Then(2)
Focus so far has been on building the tree by getting information from people that you can talk to – living people like parents and grandparents. Next we extend our information by talking to your living ancestors about their dead ancestors – great grandparents etc.
- Basic information – Name, birthday and place, deathday and place. What if you can’t find this out?
- Collecting what you can – photos, stories. What do your family know about ???
- How reliable is this? Documenting your sources?
· Don’t want to be too pedantic about this – it’s got to remain fun – but this is the time to start imparting good research habits
Then(3)
Researching your tree – finding out more about your dead ancestors.
- Where to find information
- Where to find help
Resources
|
Adapt this to your needs. In particular, anything between < > should be replaced, but you may make changes anywhere |
|
|
Advice for pupils on the first stage: getting information from your family. |
|
|
Information to present to a potential sponsor |
|
|
A version of the notes below as a Word document, in case you want to email it |
Notes from Chelsea
Session 1.
Got pupils registered, started building their trees. Set homework for most “Complete your tree to grandparents, further if possible”. For those like Catherine (my granddaughter) who can simply pick up a large tree: “Find an ancestor, and come along ready to talk about them”. Sent out email to group welcoming them, confirming homework, confirming that this is a family activity and that parents, grandparents will be very welcome, both to help at home and to attend sessions.
Session 2.
Spent much of first part dealing with forgotten passwords etc. Didn’t have time to deal with Zach’s photos L. Sent email: -
Propose a bit more structure: -
· First 10 minutes (to about 12:50): “Getting Started”. Helping with logons, individual questions, etc.
· Next 10 minutes: “Teaching from me”. I will cover a FamNet topic, such as “How to Load a Photograph”, “Where to Get Information”, etc.
· Next 10 minutes: “Your Stories”. One or two of you will show us your tree (so far), and tell an ancestor’s story. Perhaps, like Catherine this week, you’ll have something of theirs to show us. Everybody has a story to tell, and the main point of FamNet is to give you a way of recording your family’s stories before they are lost for ever.
· Rest of the session: “Working on your trees”.
Dealing with photos: - bring them along, I’ll scan them and email them back.
Session 3.
I’ve improved the group admin page: can now reset passwords etc. Have printouts “Resetting your password” ready to hand out when you set a temporary password.
In “teaching from me”, cover “Scrapbook”, then I can set homework “Get your grandparents to tell their story”.
“Your
Stories”: “Has anybody got any interesting stories to tell?” But keep a list of
who’s presented to ensure that everybody gets a turn. So far,
Catherine.
Session 4.
By now the class is just getting on with it, and I am spending most of my time simply responding to questions. One pupil is starting to get beyond my knowledge, asking about web sites to research Scottish ancestors. I haven’t had any success in getting stories – narrative from grandparents etc to attach to records.
Notes – Various Errors and Unusual Situations
Adoptive Relationships.
If a person has been brought up by people who are not their biological parents, then you have a choice about showing their Father and Mother as the adoptive or birth parents. The other relationship can be recorded as a GDB Link. For example, suppose that your father is adopted, and you want to show Nana and Grandpa who brought him up as his parents, but record his birth mother also.
1. Create the tree with your father. Click [Add] for his mother and add Nana, and [Add] for his father and add Grandpa
2. Now you want to create a record for his birth mother. Let’s say her name was “Mary Brown”. If Mary Brown is part of your tree somewhere else – perhaps an aunt – you can add her in the correct spot. If she was unrelated then you can’t click any of the [Add] buttons, this would create a record for Mary Brown linked into your tree, so you click the [New] button and create a new record that is not linked at all.
3. Now you return to your father’s records (search for him). Click the [Edit] button, and then [GDB Links]
4. Select relationship type “Birth
Parent” and search for the record of Mary Brown that you created in step 2.
Click this record to select it. This will create a GDB link with type “Birth
Parent” from your father to Mary Brown. If you open Mary Brown’s record you’ll
see a GDB link with type “Natural Child” to your father.
Or you could link the biological parents normally, and use GDB links for the adoptive parents. I’m not sure which is better. When you print charts FamNet will follow the primary links (Father/Mother) and ignore GDB links.
Step Families
In the tree view you will have added a person and their parents. When that person is the current subject of the tree view then you can click [Add Sibling] to add their brothers and sisters. FamNet assumes that each of these is a full sibling with the same mother and father. But what if one of the parents has remarried and a sibling shares only one parent?
The easiest way of dealing with this is as follows. For example, let’s suppose that your mother has remarried, and your brother has a different father.
1. Open Tree View with yourself as subject. It will show you and your parents (and more generations?)
2. Click [Add Sibling] and add your brother.
3. Select your brother so that he becomes the subject of the tree. You will see that his parents are the same as yours: this is incorrect, so we need to correct this.
4. Click the button [Family Links] (you may need to click [Edit] first), and delete the link to your father.
5. Now click the button [Tree View]. You’ll see the tree redrawn: while your brother still has his mother recorded, in the position for his father there is simply an [Add] button.
6. Add his father (or click [search] if a record already exists in the database that you want to link to).
Children without Emails
Every FamNet user should have a unique email – but some of your children may not have an email at all. You can enroll them using …@noemail.com, e.g. Sarah@noemail.com.
FamNet has been programmed: -
1. @Noemail.com is recognized as “not a real email”
2. The first part may be changed to make
it unique. For example, if there is already a userid
of “Sarah”, this will become “Sarah1” or “Sarah2” etc to make it unique.
Adding siblings when parents are unknown
Adding siblings is easy: you select a person so that they become the subject of the Tree View, and then click [Add Sibling]. But what if you don’t know either parent? A child may know their uncles and aunts – siblings of their parents, but not know who their grandparents. A sibling is somebody who shares a parent, and the Tree View doesn’t display the [Add Sibling] button unless there is at least one parent, so how to you add these uncles and aunts? Without a parent record you can’t record a sibling relationship.
If you want to add siblings but you don’t know either parent, create records for at least one of the parents with name “Unknown”. You can always edit this later if/when you find out. Thus to add siblings of your father – your uncles and aunts – when you don’t know his parents: -
1. Select
your father: he becomes the subject of the Tree View. Both of his parents are
missing, there are only [Add] buttons in the Father and Mother positions, but
there is no [Add Sibling] button.
2. Click
the [Add] for Father, and add a record with name “xxxx,
Unknown” (xxxx will be the same as your father).
Click [Finished Editing this record]
3. Click
[Add] for Mother, and add a record with name “Unknown”. Click [Finished Editing
this record]
4. Now
add his brothers and sisters with [Add Sibling].
Here’s an example I created: I want
to add the brother of Robert Barnes, but I don’t know the names of the parents
so there’s nothing in the Mother or Father position: -
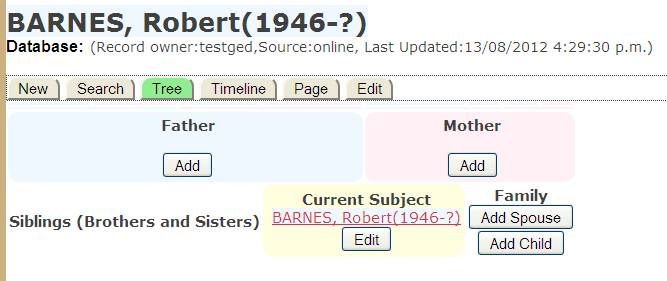
To add the brother we create records
for Father and Mother.
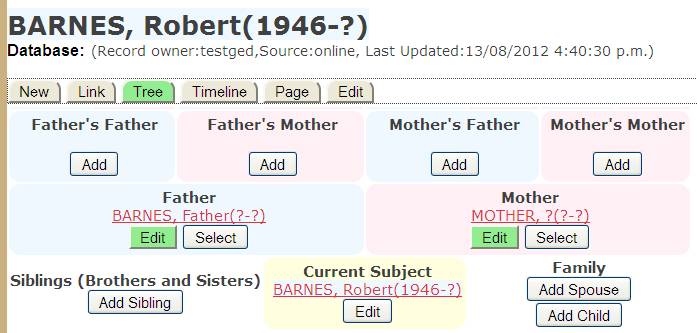
Of course
there isn’t any real information about these people, and so we’ve given them
temporary names. If/when we find out more we can come back and edit these
records, but in the meantime they are placeholders, and the [Add Sibling]
button appears. Now we can simply add Robert’s brother.
Talking to your grandparents
(and parents and anybody else you can talk to).
“Talk” may mean talking face to face, telephone, email, or writing letters. I expect your grandparents are like me: they’re really happy to talk to you about the family, delighted to be asked in fact, they just don’t want to bore you and so they’re waiting to be asked.
What do you want to know? Everything! To me, family history isn’t just a list of names and dates – I want to know what sort of lives my ancestors lived, and how these differed from the lives that we live today. You may think of more questions, but here are some to get you started. The questions are just prompts, something to guide the conversation, but let the conversation flow, who knows where it will lead? Perhaps you can record the conversation. Remember that you’re not filling in boxes on a form, you’re writing notes that you’ll want to read later. The more you can get recorded the better. After all, when you are the grandparent these stories will have been be lost for ever unless you’ve recorded them. And don’t think that you have to get it all on the first go. You can go back every few years or as often as you like and update your notes.
First some questions about the person themselves.
- When were you born? Where?
- What was the house like that you grew up in? Where was this? If there were several houses, then why did the family move?
- What was your family like? Did you have any brothers and sisters? What did your parents do?
- Where did you go to school? What was it like? Some grandparents may have had little schooling (even more true with great grandparents), others may have university degrees. The school system in other countries might be different to ours.
- What did you do when you left school? Your grandparent probably had a series of different jobs over their lifetime. This is an opportunity to talk about their life, the different sorts of things that they did. Along the way there might be all sorts of interesting stories.
- Where/when did you meet Granny (or Grandpa if you’re talking to Granny)? Where, when were you married? Where did you live when you were first married? What was this house like? What about when you were bringing up your children. Again, there may be several houses at different stages of their life. Find out about this, why they moved, and so on. They might have even moved to another country, permanently or temporarily.
- What has changed since you were a boy (or girl)?
You’re not ONLY interested in this person, you also want to know about their family
- What can you tell me about other members of your family? This is an opportunity for you and the grandparent to ask and answer the questions as far as you can for his/her parents and siblings. They may remember back to their grandparents, i.e. your great great grandparents, although some of the details may be sketchy and vague. You can also ask them about their children – and start to build out the tree of your uncles, aunts and cousins. If you get lucky you’ll find a relative who is interested in family history and has already built up a family tree and much of the information that you’re looking for. Either get a copy of this information, or get them to put it into FamNet themselves.
Also
- Collect pictures and copies of family documents (birth certificates etc). These can be added to FamNet to make your family tree more interesting
When you’ve done all this, go through your initial notes putting things into some sort of order, correcting any errors that you find, and so on. If your Word skills are reasonably good you might like to write up the notes as a “Biography” (a story of one person) or “Family History” (a story of a family – several people), perhaps adding the pictures that you’ve gathered into it. Go back to the person you interviewed and give them a copy of what you’ve written. Reading it a week or two later will probably remind them of more things to tell you.
Upload your notes to the scrapbook for the relevant person. If the document refers to several people on your tree you can attach it to all of them.