Creating, Viewing, and Changing Table Data
Creating,
Viewing, and Changing Table Data
Show Records with Child Records/Show all Records
Searching with Wild-card Characters
Searching with Comparison Operators
Comparing text and numeric values
Searching with Date and Genealogy Date Fields.
Selecting which Columns to Display
Updating and Downloading Table Data.
Creating a new record (adding)
Adding or Changing a Row with Extra Columns
Adding and Updating Image and Attachment fields
Uploading
Data from a Spreadsheet
Downloading records in a spreadsheet
Tables with Images or Attachments
Searching and On-line Updating
Displaying tables with images: Image Libraries and Grid
View
Click here for information on how to define and create tables that you can put data into.
Introduction
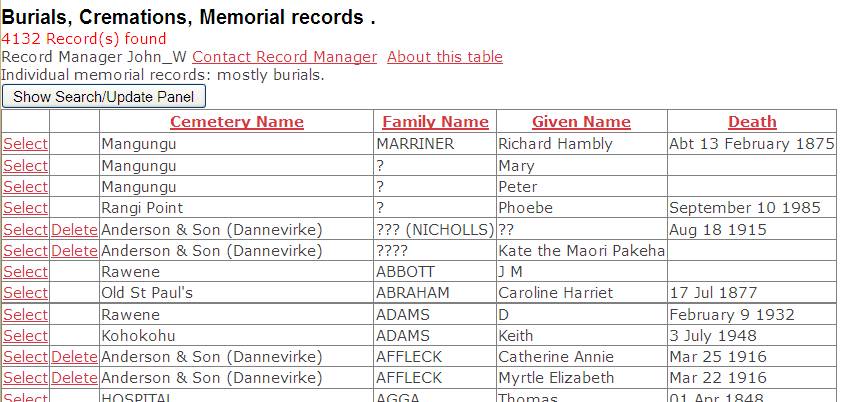
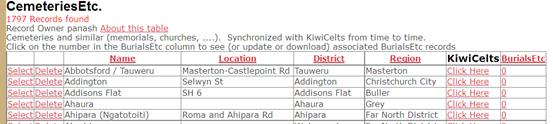
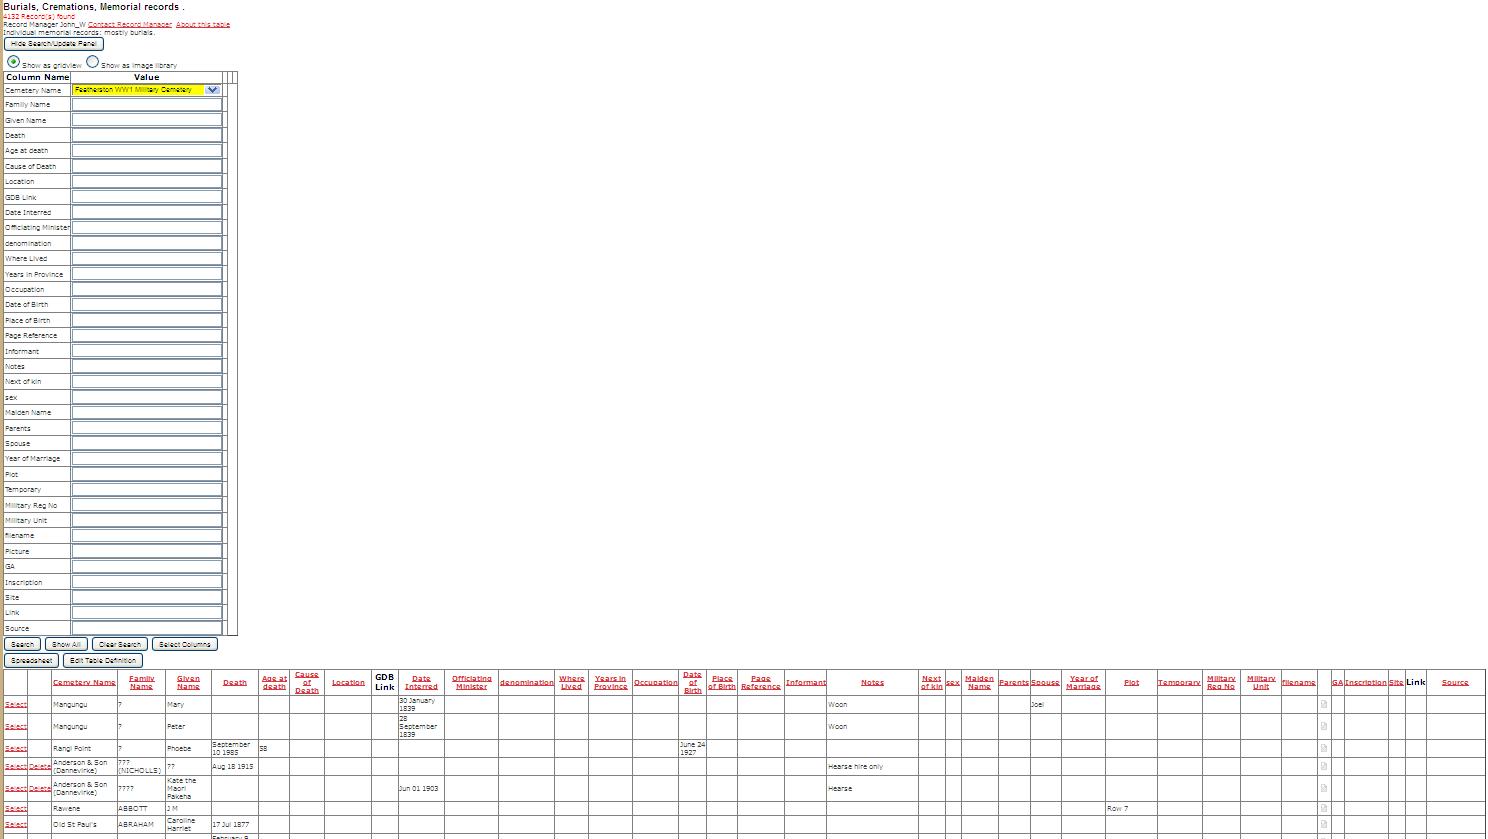
The General Database Search page shows a database list. Click “Open” for a table and you’ll see a display like this: -
…

What you see may be different: -
· If the table is very large it may open with the search panel, requiring you to select which records you want to see before any are displayed.
· Depending on the table definition and the permissions of your userid, you may be able to update it on-line.
· Often only the important columns will be displayed: for example the burials table has 31 possible columns, but if these were all displayed the grid would stretch across several screens, and be mostly blank.
Page Layout
Let’s look at the way the page is arranged before we discuss record searching and table updating in more detail. Note that many of the controls shown will not appear if you do not have the appropriate permission: for example, most users have only “Read” permission, and so will not see the “Delete” column in the table of Broadwood Cemetery burials, nor will they see upload, update, or add buttons with the Search/Update panel.
Contact me
Just under the table name appears something like this: -

First there may be a message line. In this case “4132 Record(s) found”. It there has been a problem there may be an error message like “Invalid Date”.
Next there is a line for the record owner. In cases like Burials where different records can have different owners, the values shown here will relate to the last record selected, and may not appear or indicate a previous record owner if you haven’t yet selected a record. Click the link “Contact Record Owner” and you will see this user’s profile (if he/she has created one) and a link to email him/her.
The person who created the table may have given some information about the records such as the source of the data, whether it is in draft or has been checked, and so on. There may even be attached documents, such as a map of the cemetery, a picture of the boat, etc. Click “About this table” to see this information.
There may then be a brief comment describing the table: Here it says “Individual memorial records: mostly burials”.
Finally [Show Search/Update Panel] may be clicked to expose controls for searching the table, and for updating it if you have appropriate authority.
The Table Grid
Columns in this grid are: -
1. Select. Click this to select a record
2. Delete. If you are allowed to update the record a Delete command appears. If the table has been defined with individual ownership, then you may see delete commands on some records only. If the table has been defined with simple ownership, and you are neither the table owner nor a group administrator, then you will not see a Delete command. In the example above “Delete” only appears for records with “owner” robertb. Usually this column will be blank.
3. Next the fields of the table appear. Here four fields appear, Cemetery Name, Family Name, Given Name, and Death. If there are many columns, then some may have been hidden: see Selecting Columns. In this case the Burials table contains more than 30 columns, so only a few are displayed.
Records are displayed 30 at a time. Page controls allow you to move forwards and backwards through the list of records.
You can sort the table by clicking the column headings.
Selecting a record
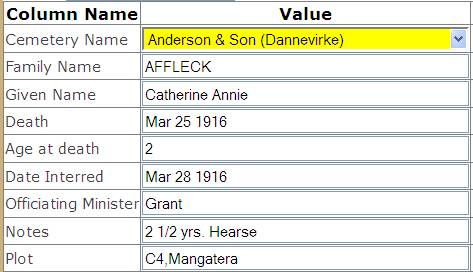
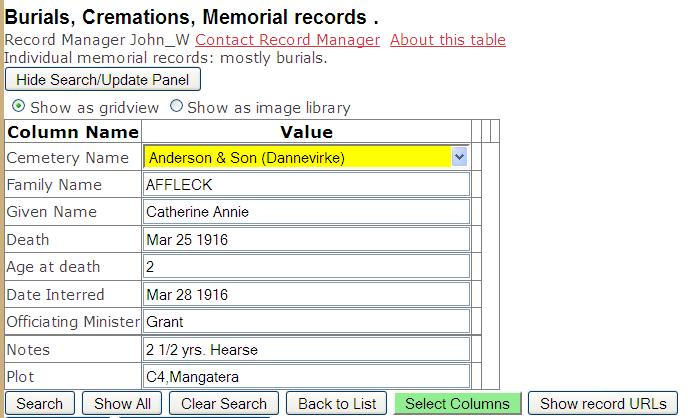
When you Select a record the grid is closed and the record is displayed in the Search/Update panel. If there is data in any of the hidden columns, this will be displayed also. Here for example I’ve clicked the record for AFFLECK, Catherine Annie. Note that as well as the four columns displayed in the grid, extra columns Age at Death, Date Interred, Notes, and Plot are displayed: -
If you have appropriate permission then you will be able to change any of these fields and click [Update] to change this record in the database. If you want to update the record by adding data into the fields that are currently blank you can click [Select Columns] and add them to the grid.
Parent and Child Tables
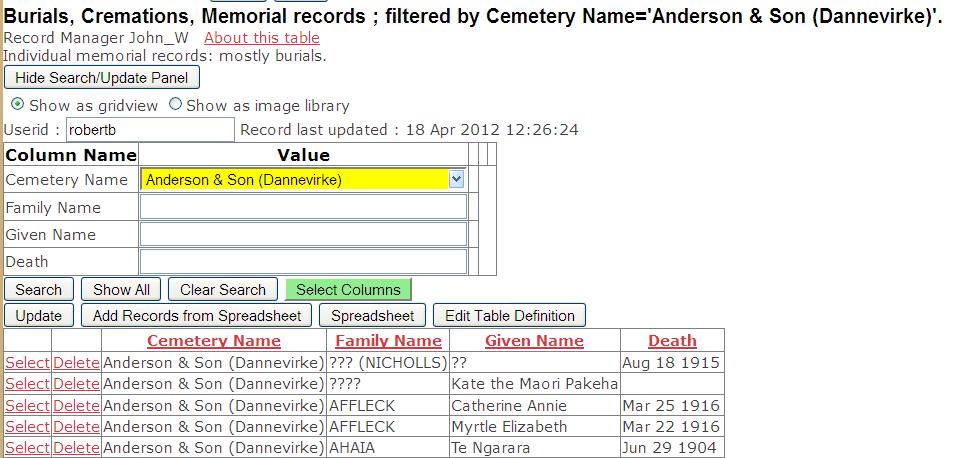
Tables can be arranged as parent/child tables. In this example, there is a table of cemeteries, so of course burials are recorded for each cemetery. The tables are arranged in a parent/child relationship like this: -

When you display records from the child table (Burials), this display may include fields from the corresponding records in the parent table. These are displayed with a yellow background. To search the child table for a particular parent value you select it from a drop down list.
Your permission (to update etc) will depend on the particular parent record (=cemetery in this example). Thus user panash “owns” cemetery “Broadwood” and can update the burial records for that cemetery, but he cannot update “St Mary’s”
You can of course open the parent table just as you open the child table. When the parent table is displayed the grid contains a count of the related records in the child table. Here is part of the Cemetery table.

If you click on the number, i.e. the “142” for Broadwood, then the child table is opened for the burials for that cemetery. The title reflects this: it will now say “Burials for Cemeteries=Broadwood. The Cemetery Name is now fixed, and cannot be changed when searching or updating records.
Reference Tables
Values may be drawn from a reference table:
for example, in the shipping table both
The Search/Upload Panel
The Search/Upload panel is displayed when you select a record, or click the button [Show Search/Upload Panel]. It contains a row for each displayed column, plus some extra controls and information. Here it is displayed following the selection of a record from the burials table: -
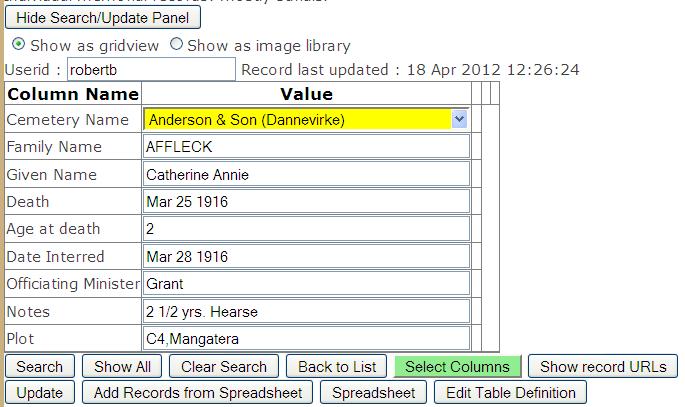
1. Because the burials table may contain images (of headstones), you have the option of displaying the table in the normal gridview form, or as an image library. This is discussed further below.
2. In cases where different records may have different ownership, the record owner of the selected record is displayed, and the date/time at which it was last updated.
3. Data from the record is then displayed. Fields are displayed if the column has been selected for display, or if it has a (not-blank) value.
4. There are then a row of controls for searching and displaying data. See below for more information about searching, for selecting columns for display, and for showing record URL’s that you might want to copy/paste into emails and messages.
5. Finally there are a row of controls for updating the table. These controls will not appear if you do not have appropriate permissions.
Colour Codes
The display above shows two coloured fields, giving you visual clues about what is shown: -
· The Cemetery Name, and KiwiCelts, are displayed on a yellow background. This is because these fields come from the parent table. You will be able to select a value from the parent table, but you cannot enter a new value here. If there are several such fields (as here), you are normally only able to select the first one. Thus the value of KiwiCelts (a link to a record in the KiwiCelts site) is predetermined once you choose a cemetery.
· The button Select Columns is green. This tells you that there are more fields (columns) in this table than are displayed. You can click the button to control which columns you see.
Table Searching
Table searching can be very simple: simply click [Show Search/Update Panel], fill in details, and click [Search]. In this section the rules of searching are discussed in more detail.
Show Records with Child Records/Show all Records
For parent tables like Cemeteries you can choose to show only the records for which there is at least one child record, or all records.
![]()
With this value, the cemetery list looks like this, showing only the 25 cemeteries for which Burials are recorded in FamNet: -
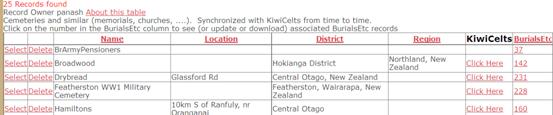
With the option “Show all records”, all 1797 records are shown: -
This option only appears when it is relevant: it does not appear for stand-alone and child tables.
Simple Search Values
The rest of the search criteria are places
where you can enter the value you are looking for in the appropriate column. For
example, looking at the Ports table, you might enter “
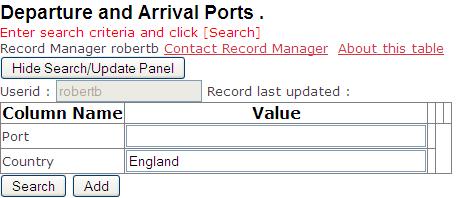
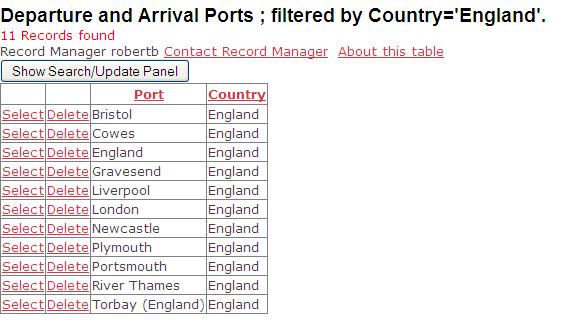
For parent-table fields, or for fields from reference tables, then instead of entering the value you select it from a list.
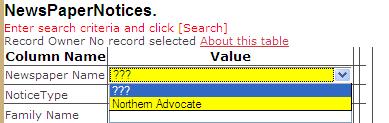
On clicking the ![]() symbol the list expands to show the possible
values (in this case there are only two), and we select one. For drop-down
lists, the first value is always “???” which means “Any value”. Hint: if it is
a long list (as with choosing the Cemetery from the Burials table), then you
can type the first character (“N” in the example shown) to quickly get to the
part of the list containing the value that you want to select.
symbol the list expands to show the possible
values (in this case there are only two), and we select one. For drop-down
lists, the first value is always “???” which means “Any value”. Hint: if it is
a long list (as with choosing the Cemetery from the Burials table), then you
can type the first character (“N” in the example shown) to quickly get to the
part of the list containing the value that you want to select.
For other fields, the value is entered as text. It must be correct for the type, for example you will get an error if the field is a number but your search value is not numeric, a date but your search value is not a date, and so on. There are special rules for “Name” fields which are explained below.
Searching with Wild-card Characters
If you enter a search value as above, “
If you want to give part of a value of a text
field you can use a “wild card character”, which is either “*” or “%”. This
means “zero or more characters of any value”. For example, if we search for
“New*Zealand” we will find both “
You can only use wild card characters with text fields, you can’t use them with other types of fields, like numbers, dates, reference fields, etc. With Name fields there are special rules – see Searching with Name Fields below.
Searching with Comparison Operators
A simple search such as the search for “
![]()
Possible operators are: -
= Equal to.
> Greater than
>= Greater than or equal to (e.g., would include the year 1850 in the example above)
< Less than
<= Less than or equal to
<> Not equal to
You can also search for values FROM Value1 TO Value2, for example “From 1 to 5”. Value 1 should be the lower; for example, if you search for names “FROM Smith TO Jones” you won’t find any, you should search “FROM Jones TO Smith”.
You cannot use wild card characters if you use an operator. Thus a search for
![]()
is equivalent to a search for
![]()
On the other hand, a search for
![]()
will find people with family name “Johns”, “Johnson”, and so on, whereas
![]()
will only find people whose family name is “johns*”, i.e. they must actually include the asterisk in their name.
Comparing text and numeric values
Numeric fields are compared by numeric value: for example, 1850 is greater than 850. Dates are compared in calendar sequence, so that “Greater” means “Later”. Text values are compared from the left character by character, so that “Smith” is greater than “Jones” because “S” comes after “J” in the alphabet. In a text string a numeric character is regarded as less than an alphabetic character, so that “9” comes before “A”.
Searching with Date and Genealogy Date Fields.
When you search for a date field, the search looks only at the year. Thus if you search for records with date “>=6/2/1840” this is actually interpreted as “>=1840”, and the results will include records from the beginning of 1840.
With a genealogy date, the GEDCOM standard qualifiers are interpreted as comparison operators: -
ABT year +/- 10 years, e.g. “ABT 1840” is interpreted as “FROM 1830 to 1850”
AFT year equivalent to >= year
BFR year equivalent to <= year
BET year1 AND year2 equivalent to FROM year1 TO year2
Searching with Name Fields
“Name” is a special data type for names. Name fields are represented in the database by separate Family Name and Given Name(s) field. When you enter a Name value for either searching or adding/updating a record the text that you enter is parsed (= analysed) into these two fields. For example, my name could be entered as
“Robert Arthur Barnes”
Or as
“Barnes, Robert Arthur”.
FamNet applies rules: If there is a comma, then everything before the comma is the family name, and everything after is the given name(s). If there is no comma, then the last word is the family name. Thus my family name is “Barnes” and my given names are Robert Arthur.
In searching the system uses an exact search for the family name, but there is an implied wildcard search for the given name. Thus if I searched for “Barnes, Rob” or “Rob Barnes” then I would find my record (plus others). This is exactly the same rule used when searching the Genealogy Database.
In cases where you use an operator only the family name will be used, and any given name portion will be ignored. Thus if you search for
>Robert Barnes
The results will be identical to
>Barnes
Selecting Columns
If there are many columns in a table, then displaying them all can be overwhelming. For example, here are a few records from the Burials table with all records displayed: -
To make this more manageable, the table designer may have specified that only selected columns will be displayed in the default view. This makes a more manageable display: -
Note that the button [Select Columns] has turned green, giving you a visual clue that there are more columns to see. Click this button to see a complete list of columns, and to choose which ones you want to see.
If you click “Select” then the record that you have selected is displayed in the Search/Update Panel. Fields that have values are shown even if they are not shown in the empty search grid. For example, clicking selecting the record for AFFLECK, Catherine Annie produces the display below. Note the extra fields after “Death”: -
Click [Back to list] to go back to the table grid display.
Selecting which Columns to Display
Click the button [Select Columns], and the table grid and column list disappear, and a list of the columns in the table is displayed: -
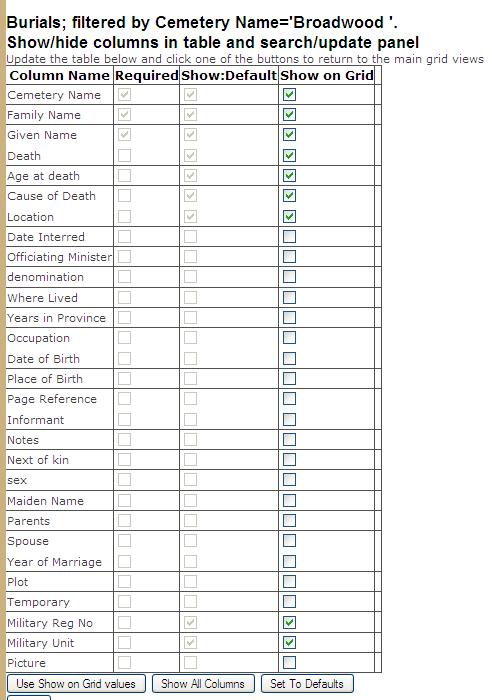
Check or uncheck the values in the column “Show on grid”. You can not uncheck required fields (Cemetery name, Family Name, and Given Name). Then click [Use Show on Grid Values] to have your selected fields displayed. [Show all Columns] is effectively a quick way of checking all fields, while [Set to Defaults] sets all the checkbox values back to the defaults.
On clicking any of these three buttons this field list disappears, and the previous display reappears with the revised column list
Show record URL’s
On clicking the button [Show Record URL’s] its text changes to [Hide Record URL’s] and a panel like this appears below the Search/Update Panel.
File Links
Here are some links you can copy/paste to
your web site, blogs, and mailing lists, to refer to this record. Copy the bits
of this that you want, and paste them into your own emails and posts
General Search. This link takes people to FamNet's general database
search. Users will need to logon, but this is free and simple.
//www.famnet.org.nz/FamNet/Databases.aspx
This table. This is like clicking on a particular table from the page
above: users are taken to this table. Users will not need to logon. If you use
this link, you might like to add some details of the search parameters that
will enable people to find your record(s).
//www.famnet.org.nz/FamNet/table.aspx?tableid=44f73a7a-83f7-4e0e-8d96-8c9d42bd0060
This Record. This takes users to the current record. No logon will be
required.
//www.famnet.org.nz/FamNet/table.aspx?tableid=44f73a7a-83f7-4e0e-8d96-8c9d42bd0060&Recordid=a1162881-0a9e-4fdf-8f68-c1ea57b6474c
Image Only. This takes users directly to the image. They will not need
to logon to see this, but they won't get any contact links, and there will be no
log records created documenting the fact that they have accessed the record.
//www.famnet.org.nz/UploadedDocs/$TableObjects/a1162881-0a9e-4fdf-8f68-c1ea57b6474c.jpg
Updating and Downloading Table Data.
If you have update rights, then you can make changes on-line. Extra controls will appear such as the delete command, and various buttons, depending on your permissions. If you feel that you should be able to see and use these controls, but they don’t appear for you, please contact the table owner or the FamNet administrator.
This, and following sections, won’t apply to most users.
In the case of tables such as Burials where you may have update rights to part of the data, if the commands don’t appear when you want them then search for your records. For example, suppose you have update rights with “Cemetery 1” but not “Cemetery 2”, if you: -
Search for records from Cemetery 1
then click [Show Search/Update Panel]
the panel will appear with the update controls.
In cases like this you will not be able to set values that would update a section of the table for which you don’t have update rights. For example, you would not be able to change one of your “Cemetery 1” records to “Cemetery 2”.
Deleting records
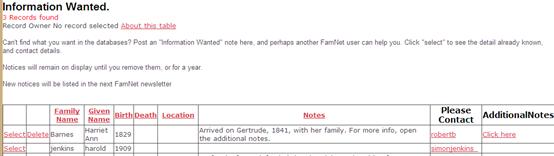
First execute a search to display the record that you want to delete. If you have delete permission then the table grid will have a Delete command after the Select command. Depending on the table, you may have permission to update some or all of the records: in the following example, the Information Wanted table, you only have permission to delete your own records, so a delete command appears for some records but not others. Here (I am user “robertb”) I can only delete the first record.
Click the Delete command to delete the record.
You will not be able to delete a record if other records are linked to it: for example, you cannot delete “Kaipara” from the Ports table if there are any voyages departing from or arriving at Kaipara. You will not be able to delete a parent record if there are child records: for example, you cannot delete a voyage without first deleting all the passengers from that voyage. Even though you can’t delete these records, the delete command may still appear: clicking it will result in an error message and the record is not deleted.
Updating a Record
To update a record, select it. The column list will be filled from the record, and [Add] becomes [Update].
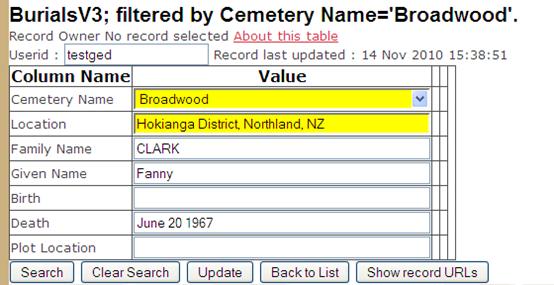
You can change any of the fields, except for parent-table fields (Cemetery Name and Location in this example). When you have made changes and click the [Update] button the fields will be validated against their definition, and if no errors are found the record is updated.
Creating a new record (adding)
If you click [Show Search/Update Panel] without selecting a record then the panel is displayed with blank values, and instead of [Update] there is an [Add] button. To create a new record, fill in the column values and click [Add]. When you add or update a record the program will check that the field contents are valid, according to the rules defined when the table was created.
Adding or Changing a Row with Extra Columns
How do you add data for the columns that aren’t displayed? For example, what if you wanted to add a value for “Maiden Name”, one of the columns define for the Burials table that is not displayed above. It’s simple: -
1. Click [Columns]. This will display a list of the columns defined for this table.
2. Either check the column that you want (“Maiden Name” in this example) in the column “Show on grid” and then click [Show Selected Columns], or
3. Click [Show All Columns]
You then return to the display above, it will now show the extra column(s) that you want.
Adding and Updating Image and Attachment fields
This is covered below.
Uploading Data from a Spreadsheet
Adding individual records is simple, but unbearably slow if you have
many records to add. If you have many records in a spreadsheet, for example a
list of burials, then you will want something quicker that allows you to simply
copy your spreadsheet into FamNet. [Copy Records from Spreadsheet] provides
this quicker method.
1.
Ensure that the table displays all the relevant
columns. If necessary, click [Columns] and add some of the hidden columns to
the list, or click [Show all Columns]. Don’t worry if the column names are
different to those in your spreadsheet, e.g. “Surname” in one and “Family Name”
in the other.
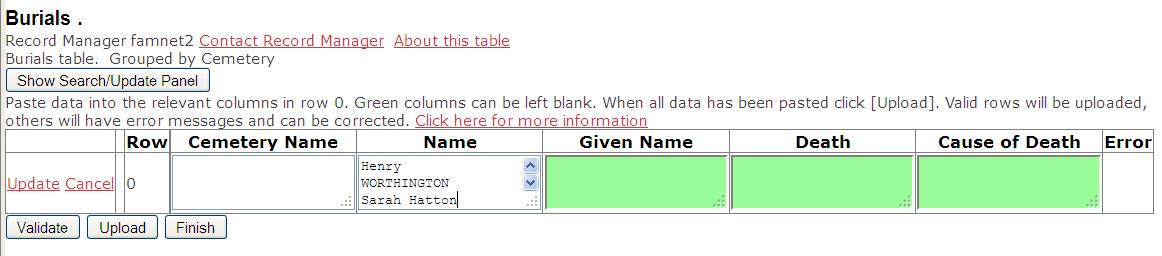
5. Continue adding data from other columns in the spreadsheet until the
grid is populated to your satisfaction.
·
If you add a longer column then the grid will be
extended
·
If you add a shorter column then blanks will be left at
the bottom.
·
If you copy another column of data, the new values will
simply replace the old.
·
If you enter a single value in row 0 (either by typing
it or by copy/paste) then this value will be copied down all rows. For example if you type the cemetery name,
all rows will be given this value.
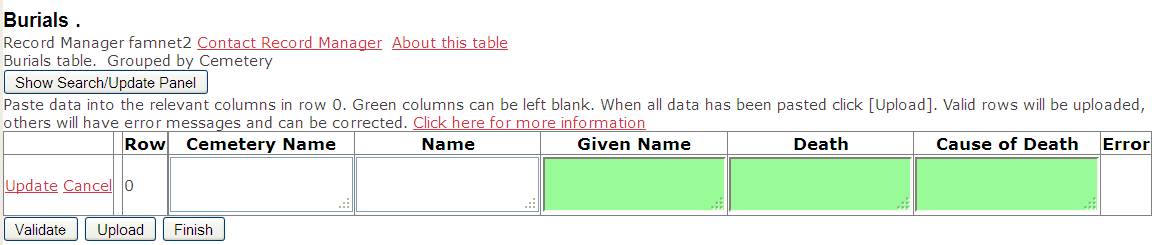
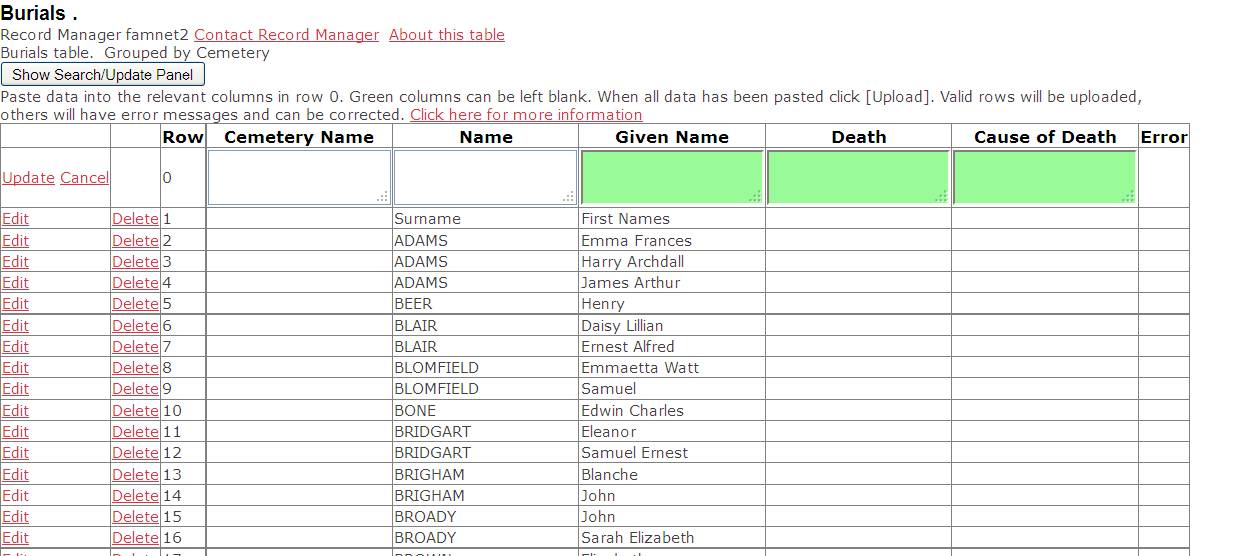
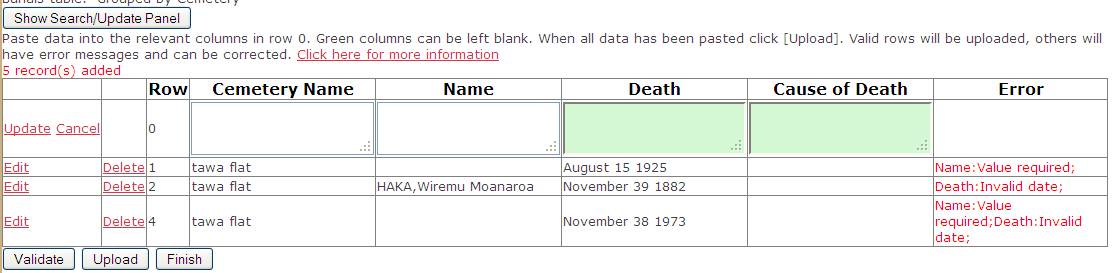
Validate and Upload the Data
Click [Validate] or [Upload] to check that the data is valid for the
table definition. For example, numeric fields are numbers, dates, are dates,
required fields (not green) have been given values, and so on. If there are
problems an error message will appear in the “Error” column, and you can click
“edit” to fix that line. You can delete lines that you don’t want, such as the
heading line in Row 1 which was copied from the spreadsheet.
Downloading records in a spreadsheet
If the record owner has given you permission to download data in a spreadsheet, you will see a button [Spreadsheet] below the selection panel. Click it a basic spreadsheet will be prepared and emailed to you. Downloaded spreadsheets: -
· Show only the columns that are visible in the grid. In the following example the Burials table has about thirty fields but only 10 have been displayed: the spreadsheet shows only these ten columns.
· Show only the records found by the search. Here we have searched Burials for Cemetery=Featherston, and Name = “ba*”, finding only three rows. These three rows are all that appear in the spreadsheet.
Here is the Table page with this search: -
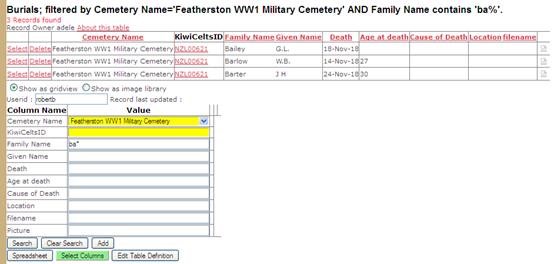
Here is the downloaded spreadsheet: -
· The spreadsheet is emailed to you as a .csv (comma-separated variables) table. This is a very basic form of spreadsheet: FamNet uses this form because it means that the spreadsheet can be read by any version of any spreadsheet program, not merely the latest version of Excel.
· Row 1 identifies the table: “Burials, filtered by Cemetery Name=’Featherston WW1 Military Cemetery’ AND Family Name contains ‘ba%’ Download at <time of download>.
· Row 2 gives the column names selected for the grid and download
· Rows 3 on give the data. In this example there are the same three rows as displayed above.

Tables with Images or Attachments
Introduction
A table may have an Image or Attachment field. Images can be .jpg, .png, or .bmp files, while attachments can be office objects (.doc etc), .pdf files, and so on. While a table may have any number of Text, Number, Name, Date, etc fields, it may have only one object field. That’s one Image field OR one Attachment field, not one of each.
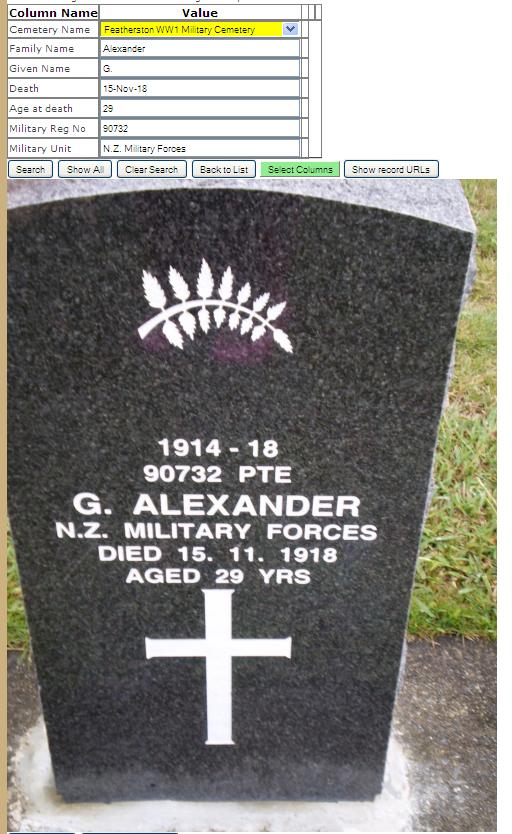
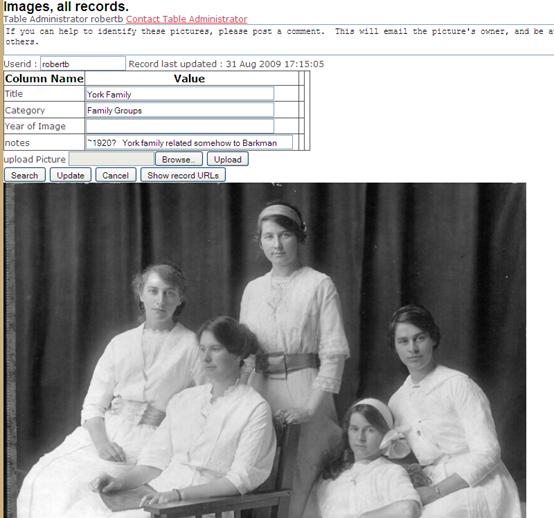
If you select a record with an image, then the image is displayed below the text values of the other columns: -
Attachments are not automatically opened in this way: instead the grid contains “Click here” which is a link that will open them on request: -
Obviously you don’t simply type new values into a textbox to add a picture or a Word document. An object may have a name like “IMG2030581.jpg” or “MyStory.doc”, but these are not the object, they are the object’s name within a folder on your computer. Even if you were to include the full reference like
C:\Documents and Settings\Administrator\My Documents\FamilyDocs\FamilyPhotos\aewellard.jpg
this is not much use. This is a reference to the file on my private laptop, and isn’t useful to the web server running FamNet. To include an object in a FamNet table the object has to be uploaded, either individually, or within a zipped file containing several objects to be linked to FamNet tables. This is described below.
When an object is uploaded it’s name, “IMG2030581.jpg”, “MyStory.doc”, etc., is saved in field “FileName”. You can include this field in your searches, in the same way as any other text field.
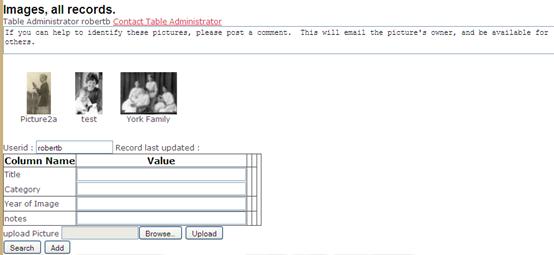
Displaying tables with images: Image Libraries and Grid View
If a table contains an image field, then it may be displayed as an “Image Library”, rather than with the normal Grid View. When the table is designed, the table owner can specify whether the table opens in Image Library View or Grid View. As an example of the difference, here is a small test table displayed in a Grid View and as an Image Library.
Grid View: -
Image Library View: -
In Image Library view, clicking the image is like clicking “Select” in the grid view. The image will be shown full size, and any other fields defined for the table will be shown in the list of columns: -
Tables with Attachments
These are displayed with a link field. In the Table Grid you see “Click here”, like this: -

When the record is selected the corresponding field in the Column List has a similar link: -

Uploading an Object.
If you are adding a new record with an object then you simply fill in the values of the other text fields (leaving the name of the object blank), and click [Browse] and then [Upload] to upload an object, just as you would to add an item to the scrapbook of a record in the GDB. The objects name (like “IMG2030581.jpg”) is set in the relevant field. You can click either [Upload] or [Add]: the effect is identical.
If the object has already been uploaded (for another record) then there will be a warning message and the previous object with this name is re-used. It does not need to be uploaded again.
To upload an object to an existing record that does not already have an attached object, select the record and then upload an object as described above for a new record. As before, if the object already exists attached to another object it will not be uploaded again, but will be re-used.
Replacing an Object
You can replace an object, using either the same name or a different name.
Replacing with the same name. Suppose you have a better copy of the picture IMG203581.jpg. If you upload it using the same name, then the previous picture will be replaced for this record and for all other records linked to it. For example, suppose that there are two burial records with this picture of their common headstone: both will now be replaced with the better copy.
Replacing with a different name. Suppose that IMG205918.jpg, an image that you have not previously uploaded, is the correct picture for this headstone. You can upload it and it will be linked to this record, but no other records will be affected. If this record was the only record linked to IMG203581.jpg, the now-unwanted image will be deleted.
Uploading Many Objects
On-line updating is cumbersome if you want to update a lot of records, so you’d normally prefer to upload a spreadsheet. However, how do you upload the objects? The answer is to use the “FileName” field, the text field that contains the value like “IMG203581.jpg”. You can update this value like any other, from a spreadsheet.
|
Newspaper
Name |
NoticeType |
Family
Name |
FileName |
|
Northern
Advocate |
Death |
Aitkens |
P1070594.jpg |
|
Northern
Advocate |
Death |
|
P1070594.jpg |
|
Northern
Advocate |
Death |
Brownlee |
P1076500.jpg |
|
Northern
Advocate |
Death |
Cottrell |
P1070605.jpg |
|
Northern
Advocate |
Death |
Cottrell |
P1070603.jpg |
|
Northern
Advocate |
Death |
Crump |
P1070605.jpg |
On your computer
1. Prepare a folder containing the images that you want to upload.
2. Move up a level so that you see the folder name (“Notices” in this example), and Zip (compress) this folder: -

The zip file must be within FamNet’s upload limit: 16MB. If necessary, edit the pictures to make them smaller, and/or create several folders and several Zip files so that each is within this limit. There is little point in putting large (several megapixel) pictures on the web: when displayed your browser will either show only a small part of the picture or compress them to a smaller size to fit your screen, and they will take a lot of time to download even with broadband.
In FamNet, open the table to which you are going to upload the images. This should already have the filenames set in the relevant fields, although at this stage there will be no images corresponding to the filename.
Upload the Zip file. On FamNet it will be unpacked (unzipped) and the individual objects loaded and attached to each relevant record. A report will be produced showing the objects successfully loaded and linked, objects that could not be matched, and records within the set of selected records for which no object has been uploaded.
Note that: -
·
The same object can be attached
to several rows. Thus Aitkens and
· The object name is given, but not the path.