Data Tables
Basic Principles of Database Design.
Getting Started – the Table Management page
Adding and Changing Table Definitions
Step 2: defining the table itself.
Defining tables on behalf of others
Step 4. Specifying
Access Permissions
Permissions:
Update, Add, Download, Upload
Editing an existing table or column
Choosing Image-Library or Grid-View Layout
Introduction.
This page is used to create data tables that can be edited and searched on line. For example, suppose your group wants to create a database of cemetery records, shipping records, or a database of searchable photographs. To do this you will need to define what the database looks like – what tables it contains, what is in each table. With the database defined, you will need web pages that give users the ability to create and edit data in these tables, and search pages so that users can look up information in the tables. You will need to define the rules about who edit and who can access the data.
In many cases simply defining the tables with this page can do this. In more advanced cases the FamNet developer(s) can develop special functions, and provide database designs beyond the capabilities of the built-in facilities.
These facilities will be explained through two examples, a shipping database that is similar to the GDB shipping tables, and a Cemetery database.
Basic Principles of Database Design.
A database consists of tables containing data, with some rules about the relationships between records in these tables. In our shipping example we want to record passengers (immigrants) arriving on ships. We decide to have two tables, a Voyages table, and a Passenger Table. They will be related by the rule “a passenger travels on a voyage”. We can show the relationship of these two tables like this. The arrow shows that each Voyage may have several Passengers, but each Passenger can be on only one Voyage. This is called a “One to Many” relationship, because one Voyage relates to many Passengers. We call the Voyages table a “Parent table” and Passengers is a “Child table”: -
A fundamental rule is that each table
should be about one type of thing.
In the voyages table we record details of the voyage: the ship’s name, departure port, date of
departure, etc. In the passengers table
we record the names of the passengers.
We don’t record the departure port (etc) in the passenger record because
if we did we’d have to repeat this information for every passenger on the
voyage. Not only would this be a lot of
duplication, creating more work than necessary, it would also introduce error
possibilities. For example, a minor
typing error could have most members of a family departing from “
We have now completed our very high level data design – the diagram above showing that we will have two tables, one for voyages and one for passengers. We now start defining the tables, starting with the top level, i.e. tables that don’t depend on other tables. This is the Voyages table. We can’t define the Passengers table until we have defined the Voyages table because of the relationship “A passenger travels on a voyage”, which means that the Passenger table depends on the Voyages table. In other words, when there is a one-to-many relationship, you define tables in this direction, one to many.
Many to Many relationships. Some of you may have spotted that our data
design is not correct for all situations.
Suppose Robert Barnes travels from
![]()
Dealing with this using a one-to-many relationship like Voyages:Passengers means that the returning passenger will have to be entered twice, and you won’t have any way of knowing whether this is the same person on a second voyage, or another person with the same name. Since defining either table first violates the rule “First define the One, then the Many table”, you’ll need some help to define these tables. If you have a situation like this, then please contact me to discuss how to handle this.
For each table we first describe the table itself, and then the information (“fields”, or “columns”) in the table. Finally we fix the table in the database, allowing us to start using it for data. Tables go through these stages: -
Described. We have the defined the table using this form, but we haven’t actually created it in the database in a form that we can start using it. While the table is in the “Described” state it is very easy to change – any of its properties can be changed, columns can be freely added, delete, or changed, and so on. The table can easily be dropped and re-created.
Fixed. The table has been created within the database. This fixes some aspects of the table: for example we cannot change the table code or change column definitions (although we can add further columns).
Used. There is now actual data in the table. This further restricts what we can change, and if we make any changes and recreate the table we will have to be careful to download the data and reload it into its new format.
For this reason you should try to describe all the tables of a set – for example Voyages, Ports, Passengers – fully before you fix and use any of them. Of course mistakes and omissions are inevitable, but it’s a lot easier if you don’t have to go back and change things.
Getting Started – the Table Management page
The General Database Search page has a button [Edit/Create Table Definition]. If you are the administrator for a table there is a similar button on the page to view that table: -
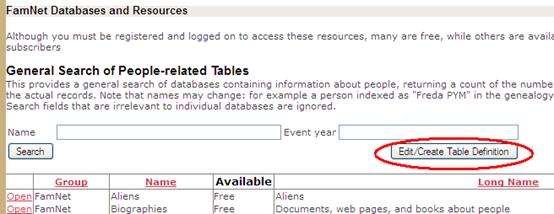
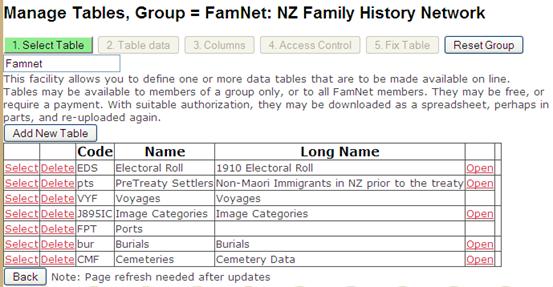
Click this. The Table Management Page will open: -
Resetting the group
If you are a group administrator of more than one group, then you will see the button [Reset Group] giving you an option to change the group. For example, if I were to change this to “GDB” and click [Reset Group] the page changes to this: -
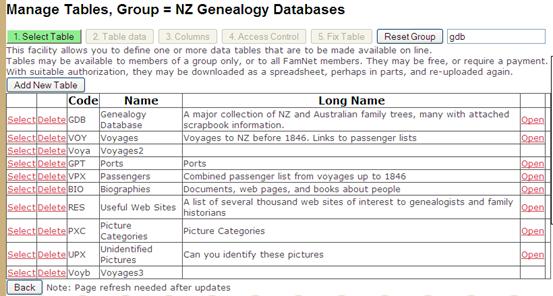
Most users however will not see this button, and their tables will be created within the only group of which they are administrator, or within the group “FamNet” if they are general FamNet members.
Other buttons: [Table data], [Columns], [Access control] and [Fix table] are not active until you have either selected or created a table.
Adding and Changing Table Definitions
To create a new table, click [Add new table]. You will become the owner of this table, being the only person (other than the group’s administrator) who can change the table.
To change the table – changing its name, columns, access rules, etc, click Select. You will not be allowed to do this if you are neither the group administrator nor the owner of the table. Once the table has been “fixed” (see below), there are some restrictions about what you can change.
To delete the table, click Delete. As you’d expect, you can only delete your own tables, and even then there are some restrictions: you will have to delete child tables first, and you will loose any data in the table unless you have saved it by downloading it. When you click [Delete] a [Confirm Delete] button appears, just in case you clicked Delete by mistake.
If you want to change the data within the table, click Open. This is equivalent to clicking Open from the General Database Search page.
Creating a table
The process of defining a table is roughly left-to-right: -
1 Select table or click [Add New Table]
2 Define the table name etc
3 Define the columns for the table
4 Specify who has access rights to this table
5 Fix the table in the database
However you may find that you have to return to an earlier step, or start defining another table to complete this one’s definition, so the order is not 100% rigid.
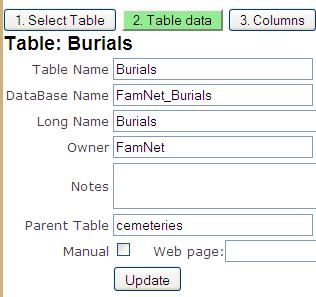
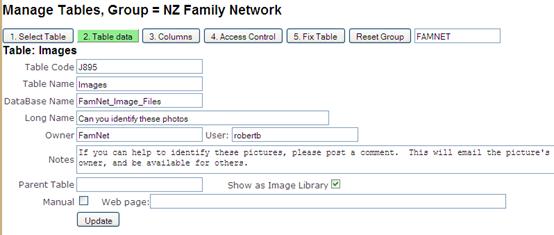
Step 2: defining the table itself.
After you click [Add New Table] the page now looks like this: -
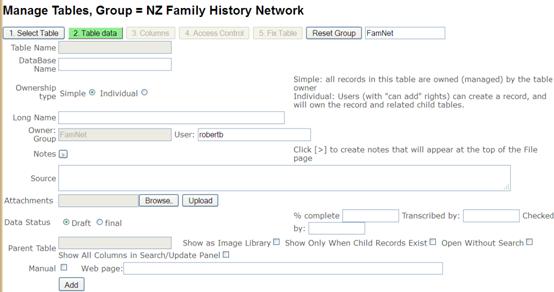
Fill in the fields, and click [Add]. You will not be able to change the table name, but anything else can be changed later so if you’re not sure what to put don’t worry, you can come back later. Fields are: -
Table Name. Required. This becomes the table name, used in lookup grids and references from other tables such as “Parent Table”. It should be kept reasonably short
Ownership Type. Leave as “Simple” for tables like “Hangings” where the submitter will be the only person (other than admins) who can manage the table. Set to Individual if each record has its own owner – for example “Cemeteries” and “Voyages”.
Long Name. This is used to describe the table on the search pages. If you leave this blank, then it will be set to be the same as the short name. For child tables it may include details from the parent table as parameters, e.g. “@1 and their Descendents”. Here the parameter “@1 ” will be replaced by the particular value of the parent table when the table is displayed, e.g. the title of this table might be displayed as “Palatines and their Descendents”.
Possible parameters are: -
@1 The value of the table section, e.g. “Palatines”
@2 The name of the parent table, e.g. “Descent Group”
Notes. Clicking
the ![]() button opens an editor with which you write
notes to appear at the top of the page when the table is opened; -
button opens an editor with which you write
notes to appear at the top of the page when the table is opened; -
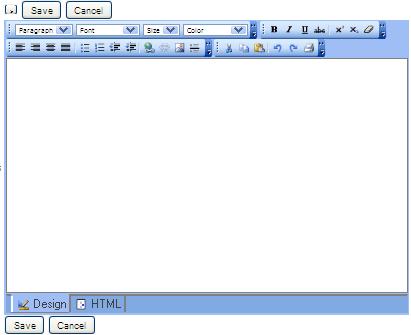
This allows you to create the note with rich text – multiple fonts, bold, italics, etc. When you are through click [Save]. Trap for unwary players, you also need to click the [Add] (or [Update]) button to save the whole table record, otherwise your “saved” note changes will be lost.
Here’s an example of this feature’s use: -

Source This only appears on this admin page, it is not visible to general users.
Attachments This allows one or more documents to be uploaded and attached to the table.
Data Status You can use these fields if you want to manage the development of a table from initial draft status to “completed and checked”.
Parent table. Used for child tables. For example, when we define the Passengers table, we will enter “Voyages”. Leave this blank for top-level tables. The table must exist, which is a reason why you have to define parent tables before you define child tables.
Show as Image Library. See Image Libraries later in this document.
Open Without Search. Normally when you click “Open” to look at a table no data is shown until you enter some search criteria and click [Search]. For smaller tables you may prefer to check this option, in which case when you click “Open” the table will initially be displayed with all of the records shown.
Show Only When Child Records Exist. Check this if this when you do not want to display records from this table unless records are present in a corresponding child table. For example, the Cemeteries table contains records (from KiwiCelts) of about 1800 cemeteries, but only 25 of these have burial data recorded (May 2011). If this option is checked, then when the Cemeteries table is displayed only the 25 Cemeteries for which Burial data is present will be displayed, unless the user clicks “Show all records”.
This option is ignored for tables without child tables, and would normally not be used for tables like Voyages where the majority of records have corresponding child records.
Show All Columns in Search/Update Panel. You can define any number of columns in a table. If there are a many columns then you will probably specify that only a few important columns will appear in the grid. Only these same columns will appear in the search panel, although once you select a record then any non-blank columns will be displayed. However, if you check this option then all of the columns defined for the table will appear in the column list, even when the record grid is limited to the few important columns.
When [Add] is clicked the remaining buttons are activated, and the page displays the Columns view.
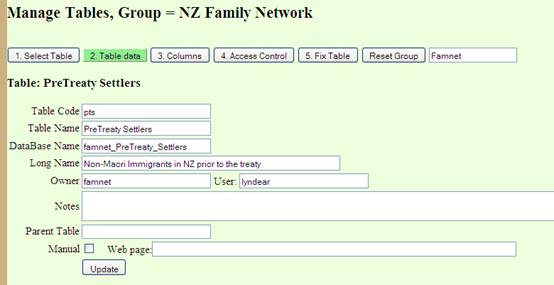
Defining tables on behalf of others
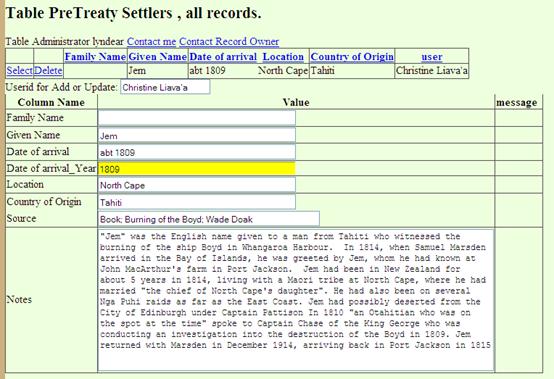
Because tables are not defined every day, and the process is a bit complicated, it is likely that most tables are defined by system or group administrators, so for these users there are a few extra fields allowing them to define a table and nominate somebody else to be the table owner. For example, here the table of PreTreaty Settlers is being defined by me for user Lyndear. Notice the extra lines, allowing me to specify the owner group, and the owner user. This table can now be managed by user lyndear or by the FamNet administrator (that’s me).
Step 3: Defining Columns
On clicking [Add] the panel above
disappears, and another panel appears so that we can define the columns (or
“fields”) in the table. As we define
fields they appear in a grid, and we can define the next field. Here we are defining fields within a
“Voyages” table. We have already defined
the first two fields, Ship Name and Departure Date, and are now defining the
third field,
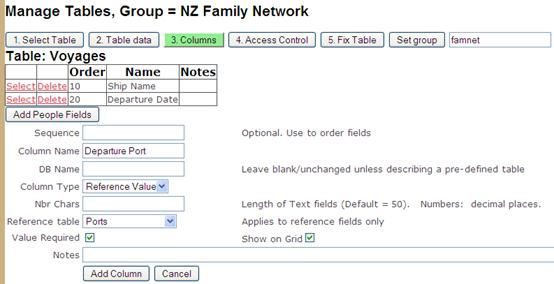
As you define each field, click [Add Column] and it is added to the column grid, and the column fields are cleared ready for the next field.
Fields are: -
Sequence A
number. This is simply
a number to keep the columns in the order that we want. As we create fields the system will
automatically assign numbers 10, 20, 30 …. If we want to insert a column
between two others, simply give it an intermediate number: for example, if we
want
Name. The column name. This will appear in various pages and search panels. There are some rules: you’ll get an error message if the name is invalid. When you are naming a field remember to use a name that will always be clear. Avoid names like “Name” and “Location” which might be used with different meanings in other tables. For example, in the voyages table above the field is called “Ship name” not “Name”. Similarly you’ll the field giving the passenger’s name should be named “Family Name” or “Passenger’s Name”, not just “Name”. Otherwise you risk having results like this: -
Passenger List
|
Name |
Name |
Given Name |
Age |
|
Gertrude |
Barnes |
William Robert |
8 |
See how much clear this is if the fields are named less ambiguously: -
|
Ship Name |
Family Name |
Given Name |
Age |
|
Gertrude |
Barnes |
William Robert |
8 |
Type. Select from this list: -
Text. Use this for normal character fields, such as a person’s name. With this option, “Nbr Chars” is the maximum number of characters. If omitted, a default value of 50 is used.
Number. Use this for numeric values. With this option, “Nbr Chars” is the number of decimal fractions, and defaults to 0.
Date * The field is a date, from 1753 to the present day. This stores the date in Microsoft Date-time format: the restriction is forced by SQL database rules. If you want to deal with earlier dates, then use type “Genealogy Date”. If you enter only the year, then the system will assume 1st January, i.e. if somebody is born in 1840 and you enter just the year, 1840, the system will store this as 1st Jan 1840. There will be nothing to distinguish this from another record where the precise date was known and the person really was born on the 1st Jan 1840.
Genealogy Date * This stores the date as a text field, but on entry the program will attempt to edit it as a date. This format will also allow a date to be entered with prefix “ABT”, “BEF”, “AFT” meaning “About”, “Before”, and “After”. The “date” may be a full date, or merely a year (a number from 0 to the current year), for example “BEF 1840”. The system also creates a companion field, “_Year”, for searching. For example, if you create a field “Birth” with format “Genealogy Date”, as well as the “Birth” column there will also be a “Birth_Year” column.
Reference Value ** The value is a lookup in another table,
whose name is selected from the “Reference Table” list. For example in the Voyages table
Related Table A
Related Table functions like a reference value, and values are looked up from
another table: but unlike a reference value there can be several Fields added
to the table. For example, you could add
the Ports table as a Related Table rather than a Reference Value if you wanted
to include both the
Related Tables are discussed in more detail below.
Image An
image file – type .bmp, .gif, or .jpg.
This is uploaded on line: it will appear as a thumbnail in the table,
and be shown full size when the record is selected. It is omitted from uploads and
downloads. A table may contain only one
image field.
If a table contains an image field, then it is usually displayed as an Image
Library rather than with the normal Gridview appearance. Refer to Image
Libraries for more detail.
Userid Typically used for a “Contact me” field, this is a userid – for example, for me it would be “robertb”. The value will appear in the table as a hyperlink, and when clicked will open the user’s profile page which contains an “email me” link. This allows the user to change their email and for references to them in tables to now use their new email. When entered, the value will be checked to see that it is a valid userid.
Attachment Like an image, this is an object that is uploaded on line, but being a document or similar it is not displayed in a thumbnail. In the table it will be displayed as a link: on clicking this link the object is opened. Typically these will have type .doc, .pdf, or .xls.
URL This is a link, for example http://www.robertb.co.nz. When the table is displayed, the link can be clicked to open the web page. On entry, if the url does not contain “://” then http:// will be added to the left.
URL’s may be carried directly, or you may give a “URL Format String”, a pattern that is used to form the actual URL together with a key value that is carried in the URL field. See the notes below under “Using the URL Format String”.
If URL’s are carried directly then you should set the length of a URL field to 250 characters.
Rich Text (Not fully implemented). This is intended to be a note field that can include formatting, and is edited with a rich text editor. It is currently implemented only as a text field, with default length 2000 characters.
Name The name of a person. This will be displayed and handled in searches as a single field, but is carried in the database as a pair of fields, family name and given name(s): -
§ When displayed, the name will be shown as “surname comma given name(s)”. For example, my name will be displayed as “Barnes, Robert Arthur”.
§ When entered, either for data entry or search criteria, the name may be given in this form or in the usual written form without a comma and with the family name last, e.g. “Robert Arthur Barnes”.
§ For searching the family name must be given exactly, but the given name need merely contain the text searched for. Thus searches for “R Barnes” and “Rob Barnes” will find the record for “Barnes, Robert Arthur”.
These are the same rules used when searching the GDB.
* When
do you use Date, and when do you use Genealogy date? Answer:
you must use a Genealogy date if the date can be before 1st
Jan 1753, or if you want to use qualifiers like “ABT”. With a Genealogy Date you cannot search for
dates within a year, you can only search for the year, so you must use a Date
field if you want to be able to search on day and/or month, or a date range.
** Reference
values or text fields. You can define a
field like “Departure” as a text field, or as a reference value. Which is best? Use text when the field can have any value
at all. Note that there is no editing on text fields, so you can enter anything
at all, including spelling mistakes.
Thus the Departure port might be entered as “
Nbr Chars. What you put here depend on the field type that you have selected.
Text Gives the maximum number of characters that may be entered. Maximum value 8000. If left blank, the default value is 50.
Number Gives the number of decimal fractions, e.g. 2 for a number that represents a value like 5.73. The default is 0
Notes. Gives explanatory information. For example, in a Burial record you might define a field “Location”. Is this location of the burial plot within the cemetery, or of the person’s death? Use the Notes to explain.
Flags: Required, Show on Grid
Required. If this is checked, then the program will insist on a non-blank value being in this column when the row is created or edited.
Show on Grid. Normally checked, but you might turn this off for long fields like “Notes”. For example, have a look at the table of Pre-Treaty Settlers. This contains a Notes field that can be quite long, so this and other fields like Source have had “Show on Grid” unchecked. When you select a record ALL the fields are shown in the select-record area under the grid: -
URL Format String
This is only relevant if the column type is URL.
In general a URL can point to any web page. For a URL field that is used in this general way you give the whole URL, from “http://” to the final character of the web site, and you’ll leave the URL Format String blank. In these cases you need to make sure that the URL field is long enough for the longest URL that you want to save.
Often however a URL field is intended to open pages in a particular site, and each URL will have the same value except for a relatively small key value. For example, a GDB Link to a record for my father will open a URL like this: -
For my Uncle Albert the URL is
Every other GDB Link will have the same form, with the URL only differing for the record key, the section after “&Linkid=”.
Another example: in the Cemeteries table there is a link that will open a page from the KiwiCelts web site. Each of these URL’s has the form
http://geneamap.kiwicelts.com/?ID=NZL01227
and only the key, NZL01227 in this case, differs from record to record.
We can save space and reduce errors by
storing only the record key with individual records, and storing the common
pattern only once in the URL Format String. For example, here’s how we set up a
link to
1. From searching the Cenotaph database we can see that the URL’s have the form: -
http://muse.aucklandmuseum.com/databases/Cenotaph/77533.detail
where 77533 is the record key (in this case my Uncle Albert)
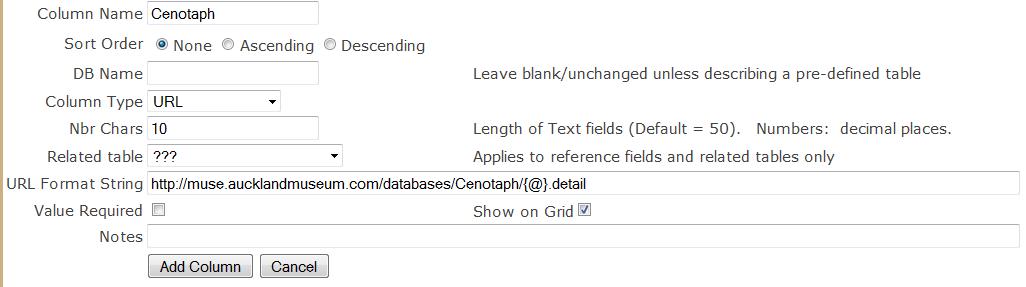
2. We define a field in our table like this: -
Note: -
a. The field type is URL, but we only need to give sufficient length to hold the key. In this case I have decided that 10 characters is enough to hold the longest possible key from the cenotaph database.
b. In the format string we write the URL, with “{@}” where the key would go. If you later re-edit the column description you’ll see that the program has replaced the “@” with the database name of the field, so that the URL Format String has become http://muse.aucklandmuseum.com/databases/Cenotaph/{TesCenotaph}.detail
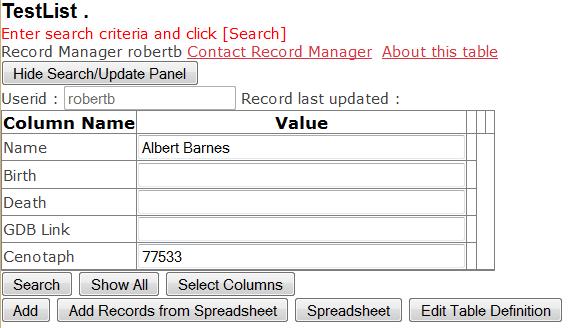
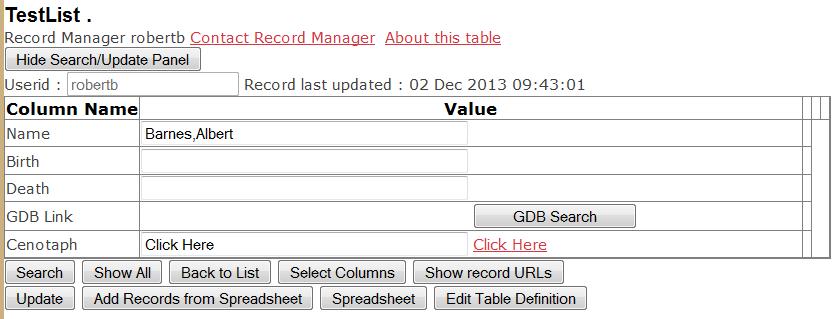
3. Now, after completing the record definition and fixing the table, you can simply enter the record key, 77533 for example, in the URL field. For example: -
After clicking [Add] this record is added to the table, appearing like this: -
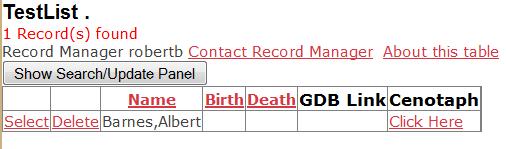
and the Cenotaph page will open on clicking the “Click Here” link.
If you have entered the wrong key value simply select the record for update: -
and overwrite “Click Here” with the correct key value.
Parent-table fields.
When you are defining a child table a control labelled “Select column from parent table” appears. This allows you to include one or more fields from the parent table.
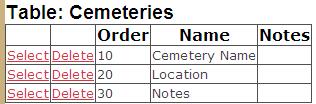
FamNet includes a Cemeteries database that initially consisted of two tables, a Cemetery table and a Burials table. The Cemetery table, which was defined first, contains only a few fields about the cemetery itself: -
Then the Burials table was defined. Obviously a Burial is within a Cemetery, so the tables are related like this: -
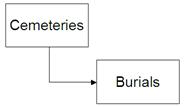
When the Burials table was defined, we named the Cemeteries table as its Parent Table: -
Now, when we come to define the columns of the Burials table, we have an option to select fields from the parent table. These fields will then appear in every record, and contain the values from the Cemeteries table.

By the way, notice that the field is called “Cemetery Name”, not just “Name”. Remember that a name like “Name” can look obvious in one context such as when you display the Cemeteries table, but then not make much sense when it is included in a child table. When included here, would “Name” mean the name of the Cemetery? Or the name of the person? Calling the field “Cemetery Name” makes it very clear. However, if the existing name does not suit the new context, then it can be given a different name within this table. You can add the parent field with its existing field name, “Name”, and then select it for editing and change the name to something else such as “Cemetery Name” that is more appropriate for this new context.
You can select any or all of the columns in the parent table. They are normally placed at the start of the table although by editing the sequence field they can be placed elsewhere. They will not be editable. If you check “Show as DDL”, then in the search panel the field will be selectable from a list of alternatives. If you leave this unchecked, then the value searched for will be typed as text, perhaps with a wildcard character (e.g. “Featherston*”).
Related Table Fields
A related table is a bit like a parent table: you get to choose fields from the related table, and you might rename or re-sequence them.
* * * To be written when implemented. * * * *
Add People Fields
This adds a series of standard fields to the table, allowing it to participate in the general database search. Click this if this table is about one person. Thus you do NOT click this for Voyages or Cemeteries, but you DO click it for Passengers and for Burials. Clicking it for the Burials record, we see that it adds columns Family Name through Location, like this: -

This creates fields with standard names (do not change the field names!) so that the general database search will work. However we usually won’t want all of these fields, so we remove the fields that we don’t want.
We will then continue defining fields like “Age at Death” that are relevant to the Burials table. If we want to record the location of the burial plot, we should use a field name like “Plot Location”, don’t just call it “Location”, as this may be confused with other tables where “Location” may mean “Place of birth”.
Step 4. Specifying Access Permissions
This section is used to define who can access and update this table. Tables may be freely available, restricted to a particular group, or private to their owner. They may be available for free, or require a subscription. There may be different subscription charges depending on group membership. Some or all of those who can see the table may be able to download it, and/or to update it on line or by download/upload. Only the table owner and system administrators can change the table's definition and rules.
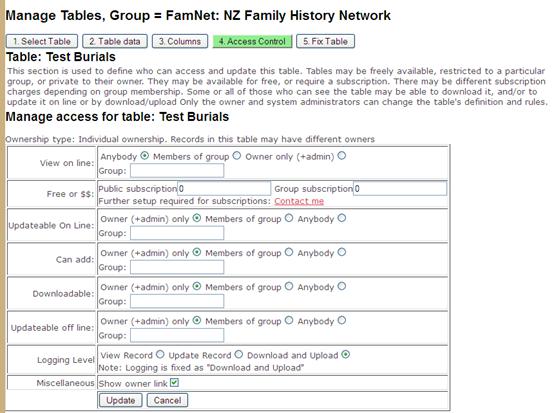
Ownership Type
Simple = all records have the same owner, who is the table owner. This means that the table owner has to define the same rules for everybody else: either everybody can update and download records, or nobody (except himself/herself) can, and so on.
Individual = each record can have a different owner. For example, you might define the Cemeteries table with individual ownership, and give everybody “Can Add” rights. This allows anybody to create a new Cemetery record, and to create the corresponding Burials records. They will be able to update their own records, but they will not be able to update anybody else’s records.
Permission: View on line
By default, the table will be available to anybody.
Set this to “Members of Group” and give the group code if you want this to be restricted to a particular group. For example, if the Kiwi Yak Herders Association[1] had decided that their Mongolian Immigration database were to be available only to their members, then the group administrator would have chosen this option, and entered “KYHA” in the group field. The group must have been defined into FamNet.
Set this to “Owner Only” if the table is private, to be seen by nobody else. This option might be used if the table is in draft state, and is not to be released until it has been edited further. Also, by setting this option the table is effectively taken off line while privacy or copyright issues are investigated and remedied.
If a user does not have permission to view a table, then (s)he obviously can not upload it, download it, etc.
Free or Subscription.
By default tables are free to anybody who has permission to view them, and so the public and group subscription costs are both $0. There is provision for two costs, a cost for general public, and a cost for group members: for example, the Yak Herders might charge $10 for members of the general public to see their Mongolian Immigration table, but make it free to their own members.
Further setup and programming will be needed to use these features. Please contact me to discuss this if you want to use this feature.
Permissions: Update, Add, Download, Upload
The defaults for all of these are “Owner (+ admin) only”. For a table with individual ownership you should set the Add permission to “Anybody”. All permissions function as described above for View.
Download gives permission to use [Download Basic], but not to download an upload-able spreadsheet.
Editing an existing table or column
Click “Select” and the table’s details, including columns, appear in the form, and the [Add] button becomes [Update]. You can then select a column and change its characteristics.
Provided that the table has not yet been fixed, any of the fields entered with Add can be changed or deleted. However, once fixed there are a few restrictions: for example, you cannot change the table code, nor the field type or details. You may however change its name. Note that if you change the name of a field in a parent table, and you have already defined a child table that includes this parent-table field, the name of the field in the child table will not be changed. You can however edit the child table and change it there.
Step 5, Fixing a table
When you have defined a table, before it can be used it must be “fixed”. This actually creates a table in the database into which data can be entered (for those with SQL knowledge, this is when the CREATE TABLE is executed).

Click [5. Fix table] to expose this view, then click the button [Fix table].
Once the table has been fixed, then you cannot change column definitions, although you can delete and add new columns. Deleting a column (or a table) will loose any data stored in the column (or table). It is recommended that you define all the tables, and all the columns in the tables, before fixing any of them, as this makes it easier to correct issues like naming a field “Name” when it should have been “Cemetery Name”.
Re-fixing a table
Once a table has been fixed, you can delete it and re-create it. HOWEVER, if you do this then any data that is in the table will be lost.
You normally only need to re-create the table if you want to redesign the table structure: you do not need to re-create the table just to change its description, or access permissions. If you have significant amounts of data that you don’t want to loose but you need to make changes to the tables, you need to following this procedure: -
1. Download the entire table as a spreadsheet.
2. Delete the table, and recreate it. This will drop and re-generate the table on the database, losing all its data.
3. Download the new table as an uploadable spreadsheet. Of course whether you use “Download for Edit” or “Download Empty” this will be an empty spreadsheet except for control information as there is now no data in the table.
4. Copy/paste the data you downloaded earlier into the second spreadsheet, and then upload it.
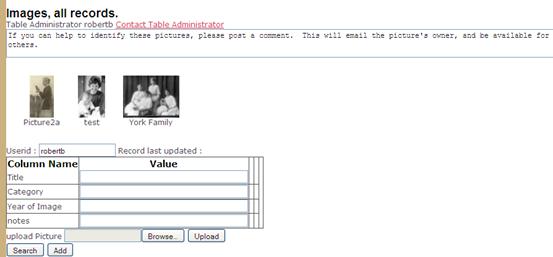
Image Libraries
If a table contains an image field, then it will normally be displayed as an image library, although it is also possible to display as a standard grid view. For example, here is a small test table with three images displayed as an image library: -
Here is the same table displayed in the grid view: -
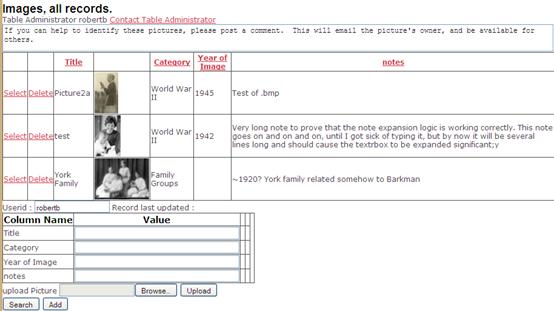
Image Caption (Title)
If there is a column in the table called “title”, then in Image-Library view this is used as a caption. If there is no such field then there will be no image caption.
Choosing Image-Library or Grid-View Layout
When you define an image file into a table, the default “Display as an Image Library” will be set. You can change this back to Grid View by un-checking this option, which you will find within the Table tab: -
This option will not be displayed, and will be set off (unchecked) for tables that do not contain images.