Groups
Group Admin Functions for Family Groups
Basic Group Administration for Family Groups
Membership Management of Family Groups
Adding Members to a Family Group
Granting General Permissions when Adding a New Member
Emailing People As They’re Added To Your Family Group
This page is used to create and administer Groups. It is displayed when the [Group] button is clicked. A group is a subset of people registered in FamNet, and each group will have at least one user who is identified as a Group Administrator. There are no other rules: the users don’t have to be FamNet subscribers, nor to have any of their records in FamNet databases.
Family Groups are a special type of group with rules and extra facilities to make it easy to give others permission to see, and perhaps to update, your records in the Genealogy Database (GDB).
On entry this page may open in the New/Find tab or Manage Membership OnLine, or some other tab. If you want another function simply click the appropriate tab button.
New/Find: Creating a group
New/Find displays functions to create a new group, or select one of the groups for which you are an administrator. The page is initialized with defaults suitable for you to create a family group: -
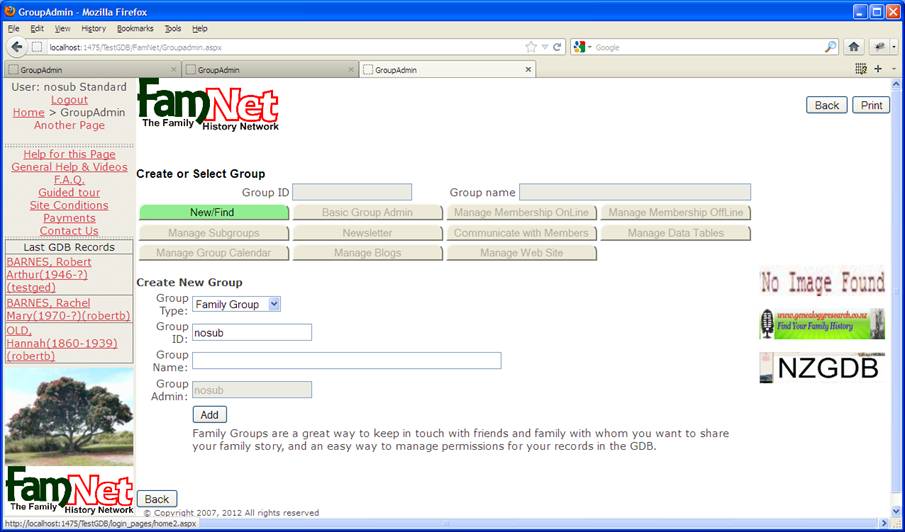
To create a group: -
1. Select the group type. Options are
a. Family Group. Use this as a personal group to share your data with your friends and family. When you create a family group then if you have granted permission to anybody to see your private records, or to update any of your records they will be added to your group.
b. School Group. Intended for schools where pupils are doing family history projects. FamNet facilitates this, especially when pupils’ extended families are involved.
c. Project Group. Intended for situations where a team are working together on a project such as building up a database. Example: Wexford.
d. General Group. Ideal for family history groups. An example: Whangarei Family History Computer Group.
2. Group ID. For Family Groups the GroupID must be your ID. Otherwise the groupid must NOT be the id of any existing user or group. For example: -
a. My userid is “robertb”, and my family group also has ID “robertb”.
b. A group such as the Whangarei Family History Computer Group has a group ID “WFHCG”. There is no real person with a userid of “WFHCG”, although the system creates a dummy “user” record with this ID.
3. Group Name. Enter whatever you like, but you must enter something.
4. Group Admin. Will be you. There is an opportunity to change this later, except for family groups.
5. Click [Add]. Parameters are validated: if OK the group is created and the Basic Group Admin tab is displayed.
Also, your Family Group is created automatically when you click the button [Manage Access/Family Groups] in the “Manage Tree” page.
Selecting a Group
If you are the administrator of more than one group, you’ll see a list of the groups that you can administer. You must select the group that you want to administer: -
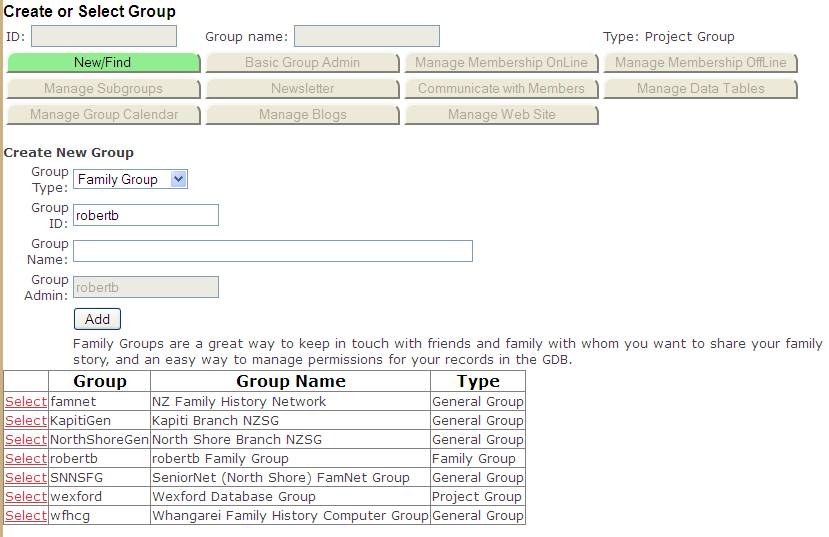
If you enter this group from a web page that implies a particular group, or you are the administrator of only one group, you’ll skip this step and go straight to either Basic Group Admin or Manage Membership OnLine.
Basic Group Admin Functions
Once a group has been created or selected the other buttons become active, and the Basic Group Admin or Manage Membership OnLine tab is displayed. The active tab is highlighted by its button becoming Green. You can of course return to [New/Find] to create or select another group.

For Family Groups most of the functions disappear, leaving only the buttons [New/Find], [Basic Group Admin], and [Manage Membership Online].

Functions are: -
|
New/Find |
Create a new group, or select an existing one. |
|
Basic Group administration |
Edit the name, description, add and delete administrators |
|
Manage Membership On-Line |
This allows you to add and delete members on line. Members may already be members of other FamNet groups, or may be completely new. If a completely new member is added, they are given a temporary password. |
|
Manage Membership Off-Line |
This provides the same functions as above, but works by downloading a spreadsheet that you can update and then re-import. You’d use these functions for mail-merge and telephoning members also. |
|
Manage Subgroups |
Use this to define and manage member groups – committee, project teams, etc. You can use subgroups to control access to resources: e.g. a table or blog might be available only to a subgroup. A group member may belong to any or all of the subgroups that you define. |
|
Newsletter |
Sends an email newsletter to the group’s members, and records it in the groups Newsletter folder. See Publishing HTML Newsletters |
|
Communicate with Members |
Offers the same Newsletter function as above, but also options to send an email message to group (or subgroup) members, and to download member lists for mail-merge (This overlaps with functions in Manage Membership Off-Line – you can use either). |
|
Manage Data Tables |
This invokes the Table Administration facilities allowing a group to define a data table and then maintain it on-line. These facilities can also be invoked from the Tables page. Only available for Project Groups and General Groups. |
|
Manage Group Calendar |
You can record events – meetings etc. – of this group. Unless marked private these events are shown on the general FamNet calendar. Only available for Project Groups and General Groups. |
|
Manage Blogs |
Creates a blog for this group. This is an experimental facility, and should only be used after discussion with the FamNet Administrator |
|
Manage Web Sites |
Currently: allows a group to give the URL of its web site. Future planning: it is intended to provide facilities allowing groups to create and maintain their own web sites. |
Basic Group Administration
Here’s where you can change the group’s name (but not it’s ID) and Description, and change administrators: -
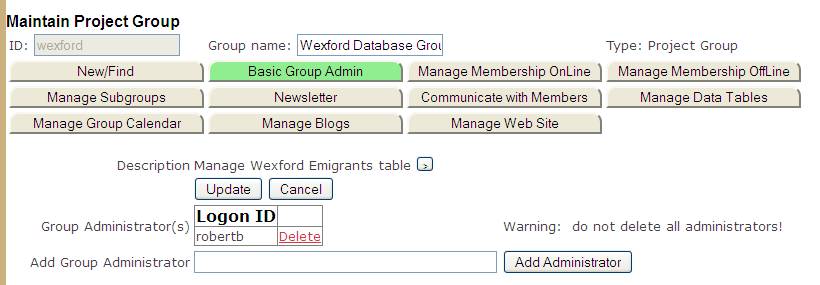
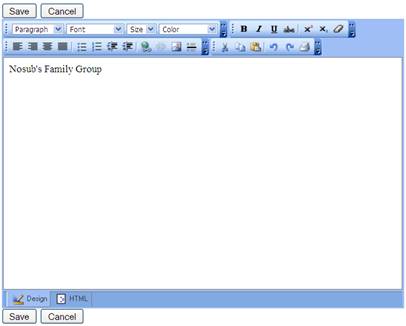
To change the description, click the [>] button and a rich-text editor appears. Change the text and click [Save]. Then, don’t forget to click [Update] to commit the change to the database.
Manage Membership On Line
This is where you can add and delete members to your group on line. It is probably the function that you use most. Its function is significantly different for Family Groups (although the same general principles apply), so if you prefer you can skip this section and go directly to the section that is specific to Family Groups.
This panel shows the group’s current membership list, with controls to add more members, delete members, and update their details: -
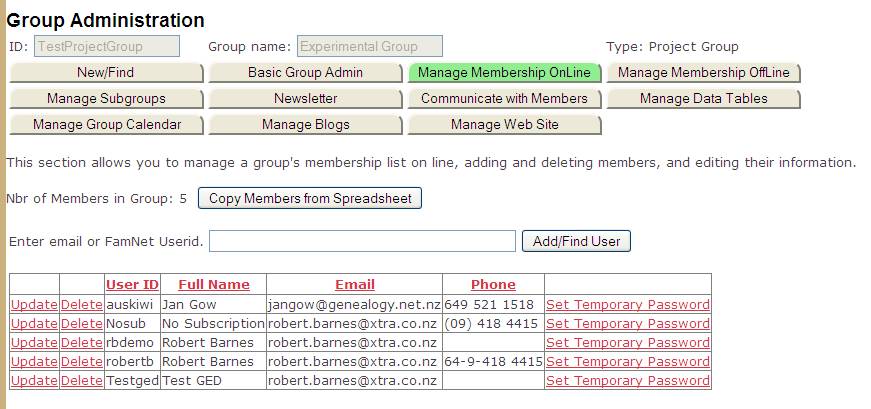
Adding a Member
To add a member, add their userid or email and click [Add/Find User]. If they are already registered in FamNet then they will be added to this group, picking up the Userid, Full Name, Email, and Phone that they already have. For example: -
![]()
If this userid is not found, or is already in the group, then you’ll get an error message.
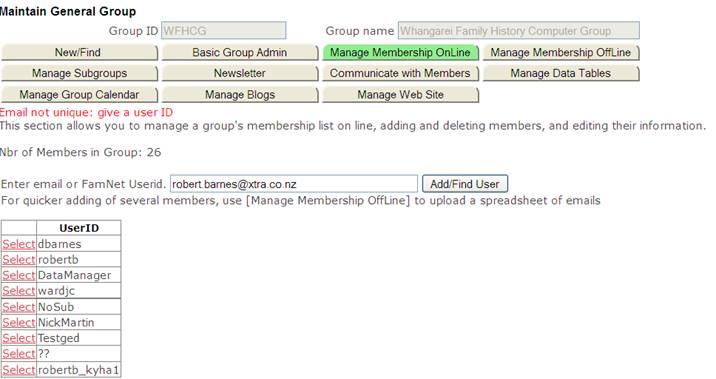
If you give an email that is not unique in FamNet you’ll get an error message that asks you to enter an actual id or select from a list. For example
If you give an email that is unique, then the corresponding user will be simply added to the group.
If you give an email that is not already registered in FamNet, then a
registration will be created, and their userid will be the first part of the
email. For example, entering an email
“APerson@hotmail.com” would create a userid “APerson”. If there is already such a user (but with a
different email obviously), then the userid will become “APerson1” or
“APerson2” (etc) to make it unique.
When a new registration is created, then this person can log on to FamNet using the temporary password “password”. They will be asked to agree to the site conditions, and then to choose a real password.
Adding Members from a spreadsheet
If you have a spreadsheet of members that you want to add, then you can download/upload the spreadsheet through [Manage Membership Offline], but this can be fiddly and so there is now another, quicker way to add them from the spreadsheet. Click [Copy Members From Spreadsheet] to expose an entry grid like this: -
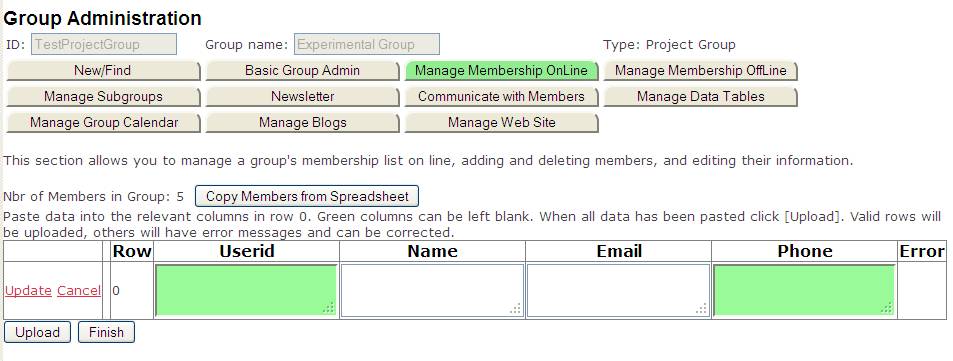
Your spreadsheet probably has different column names, and columns aren’t in this order. No problem. Using the normal Copy/Paste process that you’re used to on your PC, you can: -
· Select a column of data from your spreadsheet,
· Copy it to the clipboard (Ctrl-C on PC’s)
· Paste it (Ctrl-V on PC’s) into the relevant cell above.
Repeat for the other columns that you want to transfer from your spreadsheet to FamNet. When you have finished, click [Update] to upload this data to your group. Valid data will be uploaded and deleted from the grid, invalid rows (for example, rows with an invalid email) will have an error message. You can correct these rows and click [Upload] again.
When you have finished (or if you change your mind and decide not to upload any data), click [Finish] to hide this control.
Click here for more information about uploading data from a spreadsheet.
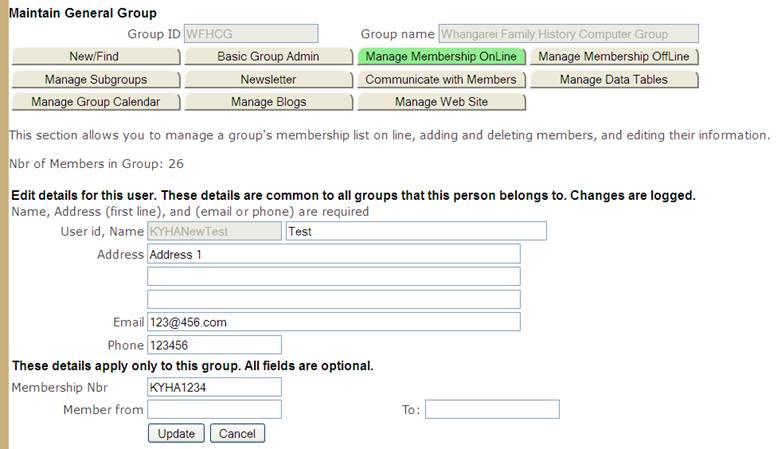
Update User
When you have added a user, or clicked one of the Update controls in the grid of users, the user’s information is displayed and can be updated. The first section is common to all groups that this member belongs to: if you change his/her name, address, email, or phone this will be changed for FamNet and for all groups that this person belongs to. The user can also edit this themselves by editing their profile (from home page, click [About you]). You cannot change their userid.
The second section is specific to this group alone: groups may have their own membership number, and record when the person joined and how long their membership is valid for.
When the changes have been made click [Update]. Click [Cancel] if you don’t want to make any changes.
Deleting a Group Member
Click Delete from the list of members, and the system deletes the member from this group. Their registration remains in the system: they may remain a member of other groups and may continue to get FamNet newsletters.
Family Groups
Family Groups are a special type of group with rules and extra facilities to make it easy to give others permission to see, and perhaps to update, your records in the Genealogy Database (GDB).
Group Admin Functions for Family Groups
For Family Groups only a few of the general Group Admin Functions are available: -

As other functions are validated, and adapted as necessary, for Family Groups their buttons will become available.
Basic Group Administration for Family Groups
This functions exactly as described above, with the additional rule that you MUST be [one of] the administrators for your group. For example, user “robertb” (that’s me) is the default administrator of the “robertb” family group, and cannot be deleted from the list of administrators.
Other additional administrators can be added.
Membership Management of Family Groups
Only on line membership management is provided, the button [Manage Membership Off Line] is not available and so it is not possible to download or upload member lists as spreadsheets.
Although the same general principles apply, on line membership management is significantly different for family groups so this section has been written so that you do not need to read the section above about on line membership management of other groups.
You may have already granted others viewing or update permissions using the previous “Manage Access” facilities. If so, then these users will automatically be added to your family group when it is created.
Here is the membership list of the robertb family group (test system): -

Note that with a Family List lines are colour-coded depending on the permissions that have been granted to these users.
1. User robertb – that’s me – has “General Update” permission, in other words I can update any of the robertb records in the Genealogy Database (GDB). User Hannah – my daughter – can also update any of my records.
2. Users abolsx and jankyha1 have specific update permissions – they can update some of my records, but not all.
3. The dark green users – adgh, kelly2, and qazwsx have general view permissions: they can see all of my records
4. The light green users – datamanager and nosub – have specific view permissions. I have given them permission to see some of my private records.
5. Anewperson – in white – has no special permission and so will only be able to see my public records.
At the bottom of the user grid a line is inserted explaining the colour codes. You get your first opportunity to set access permissions when you add somebody to your family group. At any time you can change these permissions by clicking the Update command, and editing their group membership records.
Adding Members to a Family Group
As usual you can add a member by entering their email or userid and clicking [Add/Find User]. The system first checks to see if that person (email or userid) is already registered in FamNet.
![]()
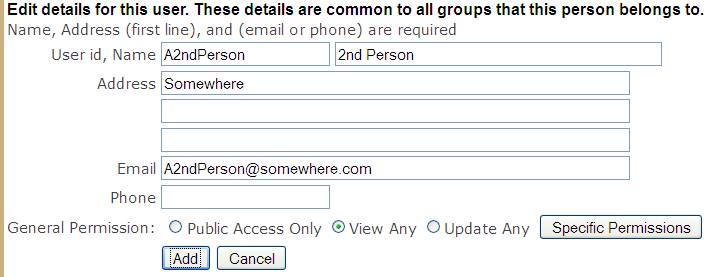
A panel then appears to allow you to enter details of this user. If they are found in FamNet then you have the opportunity to change some of their information. For family group there are three differences to other group types. Firstly, the section for membership number etc doesn’t appear: there is no need for this information in a family group. Secondly, extra controls appear to manage the GDB Access permission to be granted to this person. Thirdly, on adding a person to your family group you are prompted to send them an email.
Here is an example: I’m adding user “a10thPerson” to my family group: -
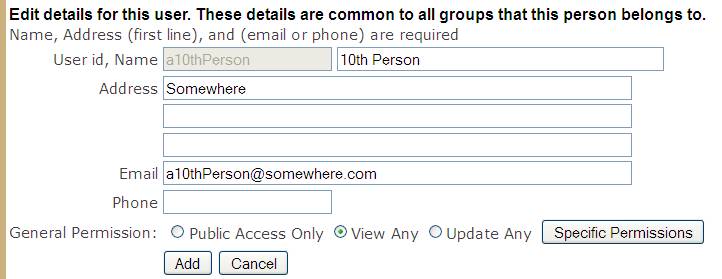
Granting General Permissions when Adding a New Member
When you add a new member their permission level is given by the settings in the General Permission line. By default members of your family group are given “View Any” permission, meaning that they can see all of your records including the private ones (living people). However they cannot update any of these records, although they can add links and scrapbook objects.
Check “Public Access Only” and they will have only the same access as the general public: they will see your public records, but not your private ones. However, unlike the general public, because they are a member of your family group they will be able to see your records without a subscription, provided that you have one. You can grant extra permissions as described below.
Check “View Any” and they will be able to see any of your records, including the private records, i.e. the living people in your tree.
Check “Update Any” and they will be able to see and update any of your records, having almost the same rights as you.
These general permissions apply to all of your records in all of your databases. Unless you have already granted “Update Any” permission (in which case any further permission would be superfluous) you can also grant specific permissions that apply to only one of your databases, or to a particular family within a database.
Specific Permissions
There are two types of specific permissions: -
· Database permissions. These are just like the General Permissions, but apply to only one of your databases. This doesn’t apply, and won’t appear, if you put all your GDB records into a single database (which is recommended)
· Individual permissions. You can grant permissions to view or update an individual record, or a family or an ancestry group, within a database.
The Permissions panel looks like this: -
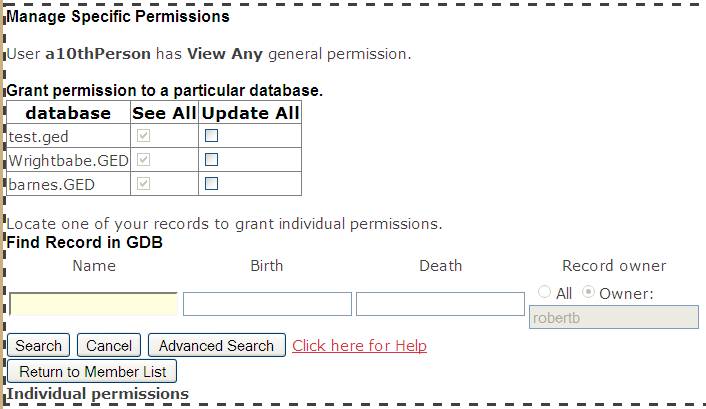
At the top you see that user a10thPerson has View Any general permission.
Because I have three GDB databases there is next a table listing these databases. Because of this general permission the option to “See all” has been disabled, but I can give a10thPerson update permission by checking the relevant Update All checkbox.
What if you want to remove the implied “See All” access? For example, suppose that I had meant to grant View Any access only to the Barnes.ged database, but not to the other two. Click [Cancel] to close the specific permissions form, then edit the general permission back to “Public Only”. Now click [Specific Permissions] again and both checkbox columns will be active and unchecked: you can check the “See All” checkbox against the database(s) that you want to grant access to.
Individual Permissions
FamNet is unique in giving you facilities to manage access not just by database, but to individual families within a database. Thus I have given my cousin and brother the ability to update our common ancestors but not to update my family so that although these records continue to be identified as having owner “robertb” this part of the database has become a shared tree.
Setting individual permissions is actually very simple: -
1. You locate a person in your database using the normal GDB search.
2. You specify the kind of access that you are granting – View or Update – and the scope of this access – this person, + descendents, + ancestors.
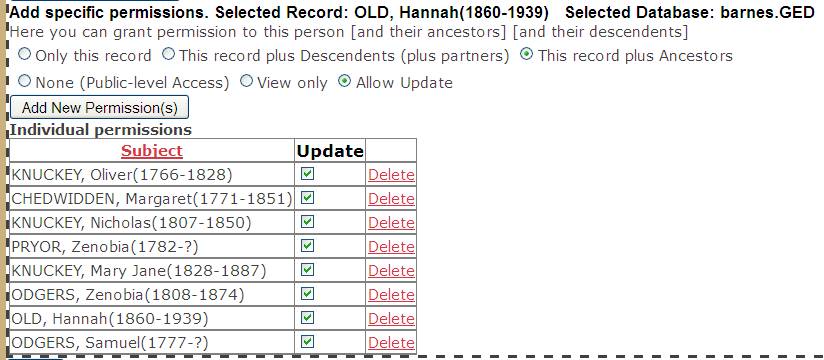
There is of course little point in granting view permission to a public record as the person will have this access anyway, but granting this permission to this record + descendents makes sense. This example shows how it’s done: here we grant a10thPerson the right to update my record of Hannah OLD and all her ancestors: -
First we search for Hannah OLD. For obvious reasons the search is restricted to our own records, and we have no option to change this.
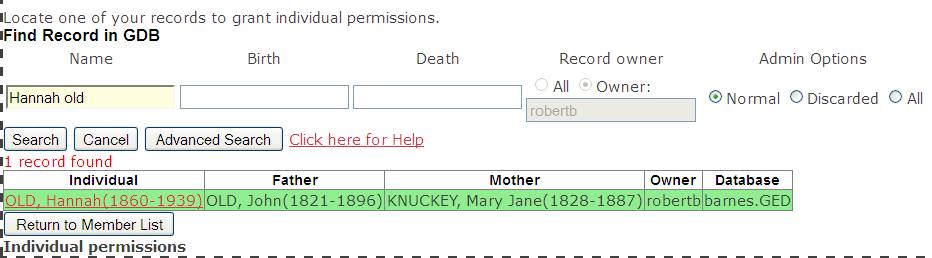
Select the record that we want – in this case there is only one option, but other searches might return several records – and the system responds with: -
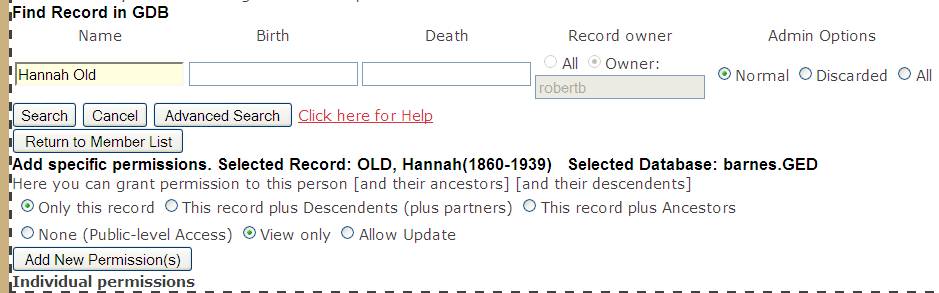
We change this to “This record plus ancestors” and “Allow Update” and click [Add New Permission(s)]. The system creates individual update permissions for Hannah OLD and her ancestors: -
Individual Permissions and linked databases
If you have created a linked database then following an ancestry or descent link may take you to a record from another database or another owner. You cannot grant permissions to other people’s records, and so the process will stop when it encounters another owner, or a change of database. Thus in the test database my Hannah OLD record is linked to my records of her mother (Mary Jane KNUCKEY) but to somebody else’s record of her father (John OLD), so only her maternal ancestors appear in the list above.
Individual View Permissions and Public records
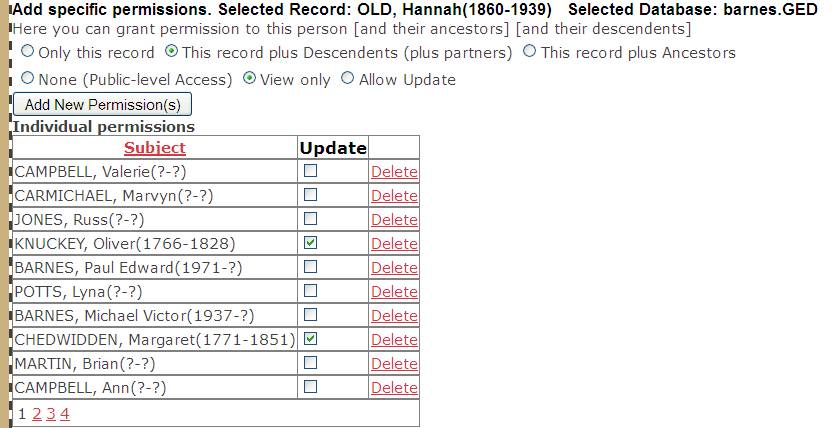
You can grant view permission to a public record, but no individual permission record is created because none is needed – the user already had enough permission to see this record. If you grant view permission to a public record plus descendents then individual permission will be granted for the private records. For example, here we grant View permission to a10thPerson to Hannah OLD plus her descendents. Individual permissions are granted to all of Hannah OLD’s descendents that are still alive, but no record is created for my rather or my uncles as these records are already public: -
More than 10 Individual Permissions
Only 10 individual permissions are displayed. If there are more then you can page forward and backward through the list by clicking the page number. You can also sort the list by clicking the column heading “Subject”
Editing Individual Permissions
You can check or uncheck the Update checkbox: -
Private records: the permission is updated to/from Update ó View
Public records: If Update is unchecked the individual permission is removed. If you wish to restore it you will need to recreate it starting with a search for the GDB record.
Individual permissions, whether Update or not, are also deleted if you click “Delete”
Emailing People As They’re Added To Your Family Group
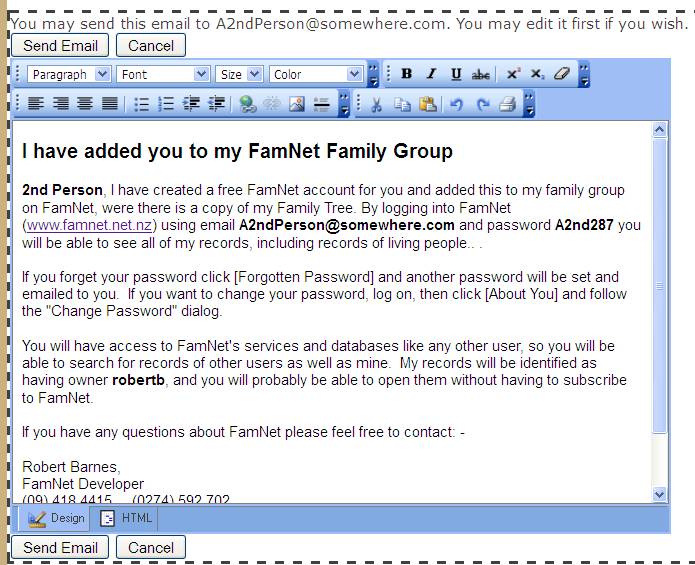
As you add somebody to your family group you the system creates a draft email based on a template, and you can either edit and send this, or ignore it and continue by clicking [Cancel].
Here is an example: we’ve just clicked [Add] from
The system adds this person to our family group, and displays this draft email: -
The draft email is somewhat shorter if they are already registered in FamNet: -
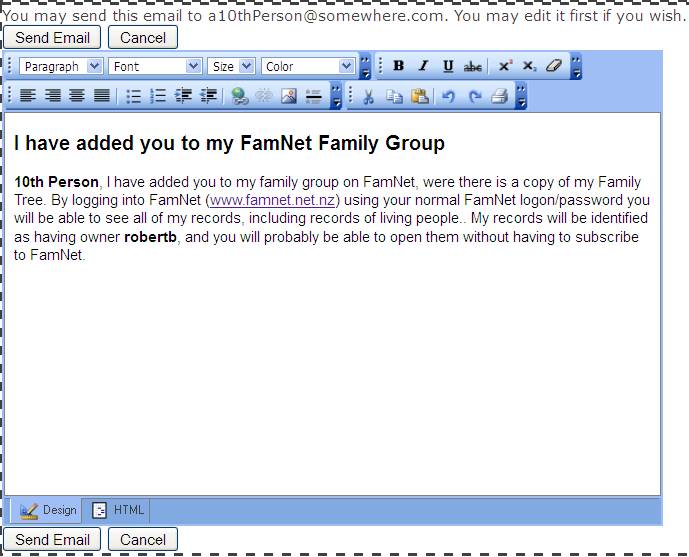
We can edit the draft email if we choose, and then click [Send Email] to send it. [Cancel] will close this panel and return us to the membership list.