Blogs
Section 1. Accessing the Blog.
Replying to a message from the blog
Replying to a message from the email.
Section 2. Setting up and
Managing a Blog
This is an
experimental facility to manage communication with a group’s members, providing
facilities to distribute newsletters electronically, and to run blogs and
discussions. Future development could
include electronic and formal votes on issues and committee elections. Blogs may be passive or active: -
·
A
passive blog allows users to post messages to it, and to reply to earlier
messages. The messages and their
replies form a threaded list: you can reply to a reply … FamNet’s blog “Letters to the Editor” is an
example of a passive blog. People can
post to this blog, and others can comment on their posts. The FamNet newsletter’s editor may choose
to reprint some of these letters in the newsletter. However emails are not sent out to others by the act of posting
to this blog.
·
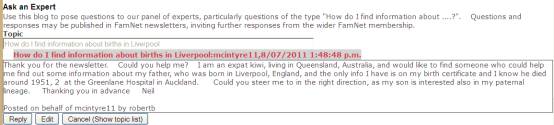
An
active blog functions in the same way, but also sends the messages out as
emails. “Ask an Expert” is an example of an active blog. When a user starts a new topic on this blog
an email is sent to the members of FamNet’s expert panel. Their posted replies are automatically
emailed to the original poster, and anybody else who has posted a message to
this blog. Emails are NOT sent to other
members of FamNet who have not joined this discussion, unless they choose to
subscribe to the topic.
The blog
administrator defines the characteristics of a blog, including who can see, start
new topics, and reply, whether the blog sends emails, and if so to whom.
Section 1 describes how a group member would
use the facility, assuming that it has already been set up on the group’s web
site. Section 2
describes how the group administrator manages the facility, setting up new
blogs, and editing the characteristics of existing blogs.
Section 1. Accessing the Blog.
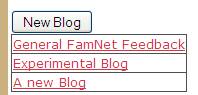
The
Blog List
A page may have
a blog list, or one particular blog.
For example, the FamNet community page looks like this: -

If you
click the button [Blogs and Mailing Lists] on the FamNet community page you’ll
see a blog list something like this: -
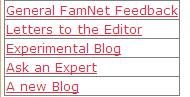
Blogs
(mailing lists) can be set up by a group administrator to be available to
anybody (even unregistered visitors), to members, or to particular groups such
as the group’s committee, so that this list will differ for different
people. Whether users can look at
messages, reply to them, or vote (when relevant) is controlled by the Group
Administrator, so that you may not see a button to reply, or may even be
refused permission to open a message.
Permissions
are applied automatically and “instantly”.
Thus if a blog has been set up for current members only, a user whose
membership expires today will be able to use the blog today, and will be locked
out tomorrow. If his/her membership is
renewed the day after, he (or she) immediately regains access to the blog.
If you have
permission to create a blog (i.e., you are a group administrator), then you
will see a button [New Blog] above this list.
Most users won’t see this button.
Clicking this button allows the administrator to create a new blog.
Clicking
the entry in the blog list opens the relevant blog. If you click the buttons [Ask an Expert] or [Letters to the
Editor] you’ll open the blog directly.
Either way, when opened it looks like this: -

A
Blog
When a blog
is selected from the list, or a button such as [Ask an Expert] is clicked, then
the blog is displayed: -
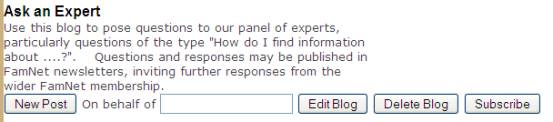
First
appears the blog title and whatever blog-header notes have been defined (see Section 2).
Then there is a list of controls.
The list of controls that appear will depend on your permissions: -
[New Post] will start a new posting
On behalf of [ ]
only appears to administrators.
This allows an administrator to start a blog posting on behalf of somebody
else, for example, when an email has been received from a group member. Enter the member’s userid or email in the
textbox: it will be validated (is this userid/email registered within this
group?). If valid, the post will be
created as if the member had posted it themselves.
[Edit Blog] will only appear if you
are a system or group administrator. It
allows you to edit the blog’s characteristics: who can post to it, do postings
produce emails, etc.
[Delete Blog] or [Archive Blog] will only appear for system administrators. When a blog is archived it will no longer appear except to system and group administrators. If the blog is empty – no messages have been posted to it – then this button reads [Delete Blog], and clicking [Delete] will remove the blog completely
[Subscribe] or [Unsubscribe]. This only appears for active (= send email)
blogs. If the blog is set up so that
you would receive emails, the button reads [Unsubscribe]: Click it and you’ll be removed from the
subscription list and won’t receive emails as further posts are made. If the blog sends emails but you are not in
the list of people receiving them, the button reads [Subscribe]: click it to receive email notices or
messages when postings are made to this blog.
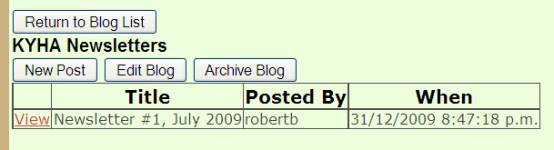
Then appear
a list of postings. Any of these posts
may have replies but this list shows only the “level one” postings, made from
the [New Post] button. 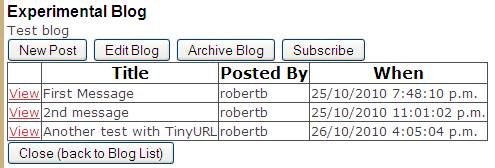
New Topics
On clicking
[New Post] a basic Word-like editor opens, and the post can be written: -
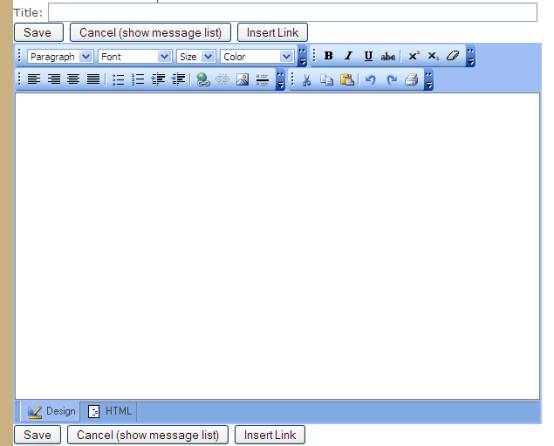
Enter a
title for the post, and write the post within the editor window. You can: -
·
Write
the post with formatting: paragraph
styles, fonts, font size, and colour.
·
Copy/Paste
from other windows. For example, you
may choose to prepare the newsletter with Word, and then paste it into this
editor window to send it.
·
You
can Upload and “attach” documents by clicking the [Insert Link] button. These are not actually attached to the email
that is sent, but are uploaded to the web site and a link is included into the
posting.
When you
have finished writing your message, click [Save] to save it to the blog. If this is an active blog, i.e. one that
sends out emails, then another button, [Post] will appear. The form of this
email, and the list of people that it is sent to, is controlled by the blog
settings.
Posting
a message (Active
blogs)
Have you
ever used a blog and posted a message, only to see it come back to you and “Oh
******, I didn’t mean to say that”? Or the message looks different after it has
been through the email system. I have certainly had experiences like this, so I
have designed these blogs to give you a second chance. Thus, after writing your message you click
[Save]. This saves the message, and
sends it to you – but nobody else, and a [Post] button appears. Of course you don’t have to check the email,
you could click [Post] immediately, but I recommend that you have a look at
your posting first. If you do not immediately email your message, you can edit
and email it later. See Editing a message. When you are ready, click [Post] and the message will be
sent. This is sent in both plain text
and HTML (formatted) form, and recipients will see one or other version
depending on their email program settings.
If the blog
has been defined with “No Emails”, then it is a “Passive blog”. Postings can be viewed and messages replied
to, but it will not send out any emails.
In this case the [Save] button appears (it is now captioned simply
“Save”, not “Save and Test”), but it does not send you a test email. For a passive blog the [Send] button will
not appear when [Save] is clicked.
Editing a message
Once the
message has been saved it will appear in the topic list, as here: -

(NB: you probably won’t see “on behalf of [ ], nor [Edit Blog] and [Archive blog]
buttons)
Click View
and you can see the message. If it is
your message, then in the buttons underneath the message an [Edit] button will
appear: -
Click this
to edit the message can be edited. You
can only edit messages if you created them, or if you are a group or system
administrator. When you have finished
editing the message you can [Save] it, and then [Post] it to email it to the
appropriate list for this blog.
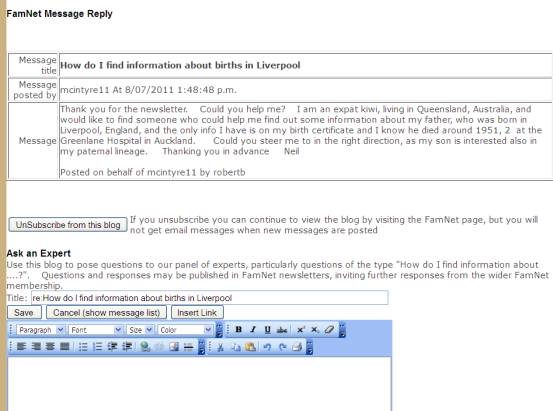
Replying
to a message from the blog
When you
select a blog the page shows you a list of topics, like this: -

Click
“View” to see the actual posting. The
topic is displayed as a “threaded list”, like this, with the original posting,
and all replies so far, and the selected message (posting) in this list is
displayed. There may be replies to
replies: -
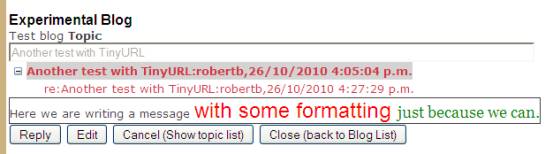
·
“Topic”
shows the title of this posting.
·
Under
this, there may be further posting where others have replied to the post. In the above case there is only the original
posting and one reply, but here’s another example where there have been many
replies, including replies to replies: -
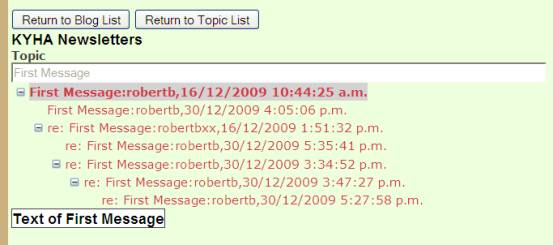
·
Next
you see the original message. In this
case the message is just testing, and has been written to show the effect of
using the formatting. By clicking on one of the replies, you can see the reply
message.
·
Finally,
[Reply] gives you the option of replying, either to the original message, or to
the reply that you clicked. This opens
the editor window, which behaves as described above for a new
post.
Replying
to a message from the email.
When you
get an email it will contain a link after the message: -

Past the
link, http://tinyurl.com/35b9pa6, into
your browser: -
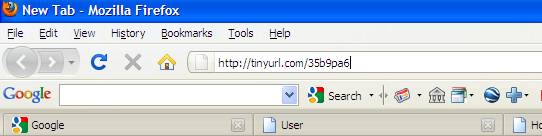
and click
[Enter] you see a page lke this: -
Here you
can UnSubscribe and Reply.
[Unsubscribe]
will remove you from the email list.
Assuming you remain a member of the relevant group, you will still be
able to view the blog on line, and you’ll be able to re-subscribe there if you
change your mind, but you will not get any more emails until you re-subscribe.
Reply
functions as described above for on-line replies.
Section 2. Setting up and
Managing a Blog
One or more
of a group’s members is given a role “Group Adminstrator”. This gives them special powers to manage the
group, and the group’s blogs.
Firstly,
they will see a complete list of blogs, and also a button to create a new blog:
-
Creating a New Blog
Clicking the
button [New Blog] displays a page where the blog’s characteristics are
set. In this example we are setting up
the blog “Committee Discussions”. Note
that here, as in most cases, the permissions are set for “Show in Blog List”
leaving the system to set all the other permissions to the same values. It is possible to set different permissions,
for example you might allow even casual visitors to read your newsletters but
only members can join discussions about them.
As noted above, a blog can be passive or active. A passive blog allows users to post and
reply to messages, an active blog will also send out email messages.
If you have
appropriate permissions the you’ll see buttons [New Blog] and [Edit Blog] at
appropriate times. Clicking these
buttons opens the following view: -
General Section.
At the top
a section appears where you enter blog’s title is entered, and header
text. The title should be unique.
If the
section “Blog Id xxxxxxxxxx-xxxx-xxxx-xxxx-xxxxxxxxxxxx appears it can be
ignored unless you’re an administrator.
This provides the blog’s system id.
Click the
little [>] button to create header text, such as: -

This will
open an editing panel where you can write this text, using different fonts as
necessary to achieve the effect that you want.
Access control
The next
section is a column of drop-down lists where each permission is given. If the permission is left unspecified,
indicated by “???”, then it will be filled in from the previous permission if
this is valid. However “visitors” may
not post either a new topic or reply to an existing one, nor can they be sent
emails. In the example above, by
setting “Show in Blog List” and “Subgroup” for the first permission but leaving
all the others unspecified, all permissions will be set to “Must be in Sub
Group/Subgroup = Test”.
Available options are: -
·
Visitors. These are people viewing this page who have
not logged on, even with a free registration.
·
Anybody
Registered. Anybody who has registered
with the group, whether they are a current member or not.
·
Current
Members. This is anybody recorded by
the membership system as a member from a date earlier than or equal to today,
until a date later than or equal to today.
It is up to the individual group to manage membership, and whether this
requires a subscription or not.
·
Must
be in Sub Group (next field). A group
may define various sub groups – Committee, Officers, Life Members, Project
Team, etc – and the Group Administrator can put members (or even non-members
who are registered) into one or more of these groups. If this option is taken, then a value must be set in the
following “SubGroup” field.
·
Administrators
Only. When applied to “Show in Blog
List”, this hides the blog from all users except group administrators.
The various
permissions are: -
·
“Show
in blog list”. If the user qualifies,
then the blog will appear in the list of blogs, and the user will be able to
click the blog title and open the list of message titles. If the user does not qualify then they have
no access to the blog.
·
“Start
New Topic”. If the user qualifies, then
the [New Post] button will appear, and they can start a new topic. They cannot be a visitor.
·
“View
Message”. If the user qualifies, then they can click on the “View” command to
open a message. Normally this would be
the same as “Show in blog list”, but a separate option is provided in case a
group has a list of articles that are only available to members, but wants to
show others the list of articles because this may provide a reason for joining.
·
May
Reply. Cannot be a visitor. If the user qualifies, then they will see
the [Reply] button and be able to post a reply to either the original message
or to a previous reply to this message.
Persistance
Set the
length of time that messages are to remain on the blog, in months. After this number of months the messages
will be automatically archived, so that they are no longer visible except to
administrators.
If set to
zero (or blank), which is the default, then messages are not automatically
archived and will remain on the blog indefinitely.
Email Options
The first
option is “Email Option(form). Set this
to one of: -
·
No
Email. This makes this a passive
blog: no emails are sent. The remaining
options of this section can be ignored
·
Email
Notification. Brief text emails are
sent “A new message has been posted to xxxx.
Click here to see it”
·
Email
Message. The message posted to the
blog is emailed, both as a text and an html email.
If emails
are sent, then the next question is “to whom?” You can separately control who gets emails for new topic
postings, and for replies.
·
New
Topic. This controls to whom emails are
sent to when a new topic is posted.
Options are
o
Nobody
o
Blog
Subscribers
o
Whole
Group
o
Group
Members
o
SubGroup
o
SubGroup
plus Subscribers
·
Replies. This controls to whom emails are sent when
a reply is posted. Options are as for
New Topic, plus another option
o
Topic
These
options function as follows: -
·
Nobody. Emails are not sent. If both New Topic and Replies are set to
this option, then this is equivalent to email option “No Email”
·
Blog
Subscribers. With this option users
must individually subscribe to this blog.
They can subscribe or unsubscribe.
Note that having subscribed they may continue to get emails even if
their membership of the group lapses.
·
Whole
Group. This is everybody who is
registered within the group, without checking that they are current members.
·
Group
Members. This checks for current
membership of the group, and will not include those whose membership has lapsed
·
Subgroup. This sends a message to members of the
subgroup – Committee, Expert Panel, etc – specified in the SubGroup control
·
Subgroup
plus subscribers. Emails are sent to
members of the subgroup, plus any subscribers to the blog.
·
Topic. This sends an email to everybody who has
posted to this topic. The intention of
this option is to allow the whole group to see new topics that have been
posted, but not be involved further in discussions of topics that don’t
interest them. However if you “join the
discussion” by posting a reply to this topic, this reply will be emailed to the
topic originator and everybody else who has posted on this topic, and you will
receive emails from any further replies.
Changing Blog
Characteristics
When the
Group Administrator selects a blog, they see two buttons that are not available
to normal users: -
[Edit Blog] This allows the blog’s characteristics
to be changed: as described above for Creating a New
Blog, but starting with the characteristics already established for this
blog.
[Archive
Blog] or [Delete Blog]
If the blog
is empty, then this button will say “Delete Blog”. Clicking it will cause the blog to be deleted.
However, if
the blog contains any messages, then it cannot be deleted, and the button will
say “Archive Blog”. Clicking this and
it becomes available only to Group Administrators, effectively deleting it for
all other users.